
Indexing as many pages on your website as possible can be very tempting for marketers who are trying to boost their search engine authority.
But, while it’s true that publishing more pages that are relevant for a particular keyword (assuming they’re also high quality) will improve your ranking for that keyword, sometimes there’s actually more value in keeping certain pages on your website out of a search engine’s index. 
… Say what?!

Stay with us, folks. This post will walk you through why you might want to remove certain webpages from the SERPS (search engine results pages), and exactly how to go about doing it.
Why You’d Want to Exclude Certain Web Pages From Search Results
There are a number of occasions where you may want to exclude a webpage — or a portion of a webpage — from search engine crawling and indexing.
For marketers, one common reason is to prevent duplicate content (when there is more than one version of a page indexed by the search engines, as in a printer-friendly version of your content) from being indexed.


Another good example? A thank-you page (i.e., the page a visitor lands on after converting on one of your landing pages). This is usually where the visitor gets access to whatever offer that landing page promised, such as a link to an ebook PDF.
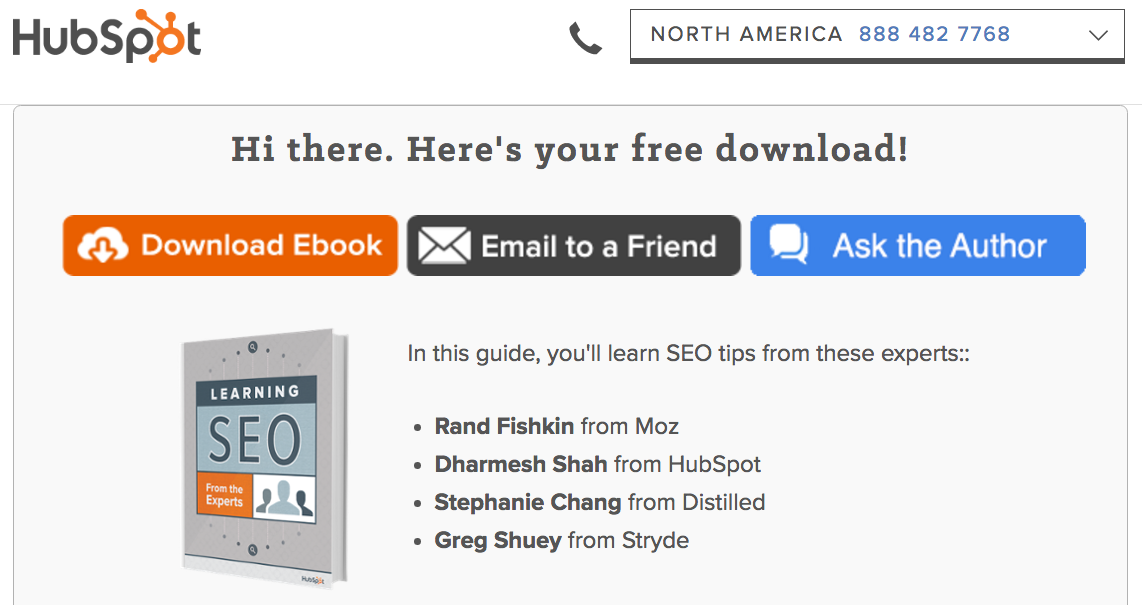
Here’s what the thank-you page for our SEO tips ebook looks like, for example:
You want anyone who lands on your thank-you pages to get there because they’ve already filled out a form on a landing page — not because they found your thank-you page in search.
Why not? Because anyone who finds your thank-you page in search can access your lead-generating offers directly — without having to provide you with their information to pass through your lead-capture form. Any marketer who understands the value of landing pages understands how important it is to capture those visitors as leads first, before they can access your offers.
Bottom line: If your thank-you pages are easily discoverable through a simple Google search, you may be leaving valuable leads on the table.
What’s worse, you may even find that some of your highest ranking pages for some of your long-tail keywords might be your thank-you pages — which means you could be inviting hundreds of potential leads to bypass your lead-capture forms. That’s a pretty compelling reason why you’d want to remove some of your web pages from SERPs.
So, how do you go about “de-indexing” certain pages from search engines? Here are two ways to do it.
2 Ways to De-Index a Webpage From Search Engines
Option #1: Add a Robots.txt file to your site.
Use if: You want more control over what you de-index, and you have the necessary technical resources.
One way to remove a page from search engine results is by adding a robots.txt file to your site. The advantage of using this method is that you can get more control over what you are allowing bots to index. The result? You can proactively keep unwanted content out of the search results.
Within a robots.txt file, you can specify whether you’d like to block bots from a single page, a whole directory, or even just a single image or file. There’s also an option to prevent your site from being crawled while still enabling Google AdSense ads to work, if you have them.
That being said, of the two options available to you, this one requires the most technical kung fu. To learn about how to create a robots.txt file, you’ll want to read through this article from Google Webmaster Tools.
HubSpot customers: You can learn how to install a robots.txt file on your website here, and learn how to customize the contents of the Robots.txt file here.
If you don’t need all the control of a robots.txt file and are looking for an easier, less technical solution, then this second option is for you.
Option #2: Add a “noindex” metatag and/or a “nofollow” metatag.
Use if: You want an easier solution to de-indexing an entire webpage, and/or de-indexing the links on an entire webpage.
Using a metatag to prevent a page from appearing in SERPs — and/or the links on a page — is both easy and effective. It requires only a tiny bit of technical know-how — in fact, it’s really just a copy/paste job if you’re using the right content management system.
The tags that let you do these things are called “noindex” and “nofollow.” Before I get into how to add these tags, let’s take a moment to define and distinguish between the two. They are, after all, two completely different directives — and they can be used either on their own, or alongside one another.
What’s a “noindex” tag?
When you add a “noindex” metatag to a webpage, it tells a search engine that even though it can crawl the page, it cannot add the page into its search index.
So any page with the “noindex” directive on it will not go into the search engine’s search index, and can therefore not be shown in search engine results pages.
What’s a “nofollow” tag?
When you add a “nofollow” metatag to a webpage, it disallows search engines from crawling the links on that page. This also means that any ranking authority the page has on SERPs will not be passed on to pages it links to.
So any page with a “nofollow” directive on it will have all its links ignored by Google and other search engines.
When would you use “noindex” and “nofollow” separately vs. together?
Like I said before, you can put add a “noindex” directive either on its own, or together with a “nofollow” directive. You can also add a “nofollow” directive on its own, too.
Add only a “noindex” tag: when you don’t want a search engine to index your web page in search, but you do want it to follow the links on that page — thereby giving ranking authority to the other pages your page links to.
Paid landing pages are a great example of this. You don’t want search engines to index landing pages in search that people are supposed to pay to see, but you might want the pages it links to benefit from its authority.
Add only a “nofollow” tag: when you do want a search engine to index your web page in search, but you don’t want it to follow the links on that page.
There aren’t too many examples of when you’d add a “nofollow” tag to a whole page without also adding a “noindex” tag. When you’re figuring out what to do on a given page, it’s more a question of whether to add your “noindex” tag with or without a “nofollow” tag.
Add both a “noindex” and “nofollow” tag: when you don’t want search engines to index a webpage in search, and you don’t want it to follow the links on that page.
Thank-you pages are a great example of this type of situation. You don’t want search engines to index your thank-you page, nor do you want them to follow the link to your offer and start indexing the content of that offer, either.
How to Add a “noindex” and/or a “nofollow” metatag
Step 1: Copy one of the following tags.
For “noindex”:
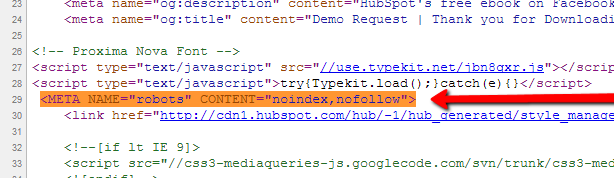
<META NAME=”robots” CONTENT=”noindex”>
For “nofollow”:
<META NAME=”robots” CONTENT=”nofollow”>
For both “noindex” and “nofollow”:
<META NAME=”robots” CONTENT=”noindex,nofollow”>
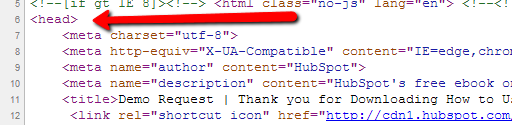
Step 2: Add the tag to the <head> section of your page’s HTML, a.k.a. the page’s header.
If you’re a HubSpot customer, this is super easy — click here or scroll down for those instructions specific to HubSpot users.
If you’re not a HubSpot customer, then you’ll have to paste this tag into the code on your webpage manually. Don’t worry — it’s pretty simple. Here’s how you do it.
First, open the source code of the web page you’re trying to de-index. Then, paste the full tag into a new line within the <head> section of your page’s HTML, known as the page’s header. The screenshots below will walk you through it.
The <head> tag signifies the beginning of your header:
Here’s the metatag for both “noindex” and “nofollow” pasted within the header:
And the </head> tag this signifies the end of the header:

Boom! That’s it. This tag tells a search engine to turn around and go away, leaving the page out of any search results.
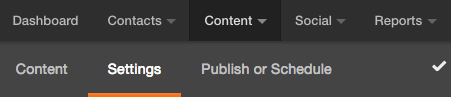
HubSpot customers: Adding the “noindex” and “nofollow” metatags is even easier. All you have to do is open the HubSpot tool to the page you want to add these tags to, and choose the “Settings” tab.
Next, scroll down to Advanced Options and click “Edit Head HTML.” In the window that appears, paste the appropriate code snippet. In the example below, I’ve added both a “noindex” and a “nofollow” tag since it’s a thank-you page.
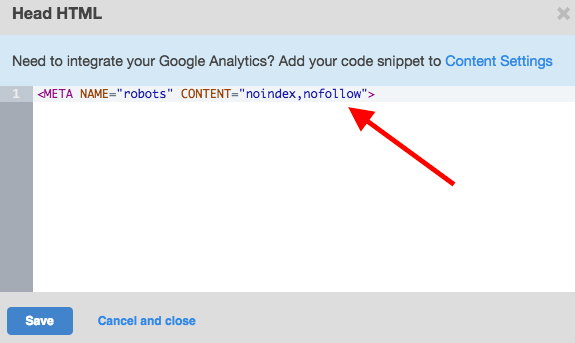
Press “Save,” and you’re golden.
Ta Da!
You’ve just magically erased your page from search engine results. Now, you can start capturing more of those lost leads again.
Now, keep in mind that you won’t see results instantaneously. Your changes won’t kick in until the next time a search engine crawls your page. Depending how often you typically publish new pages to your website, it actually could take a few weeks. The more frequently you publish content, the more often search engines will crawl your site. The best way to keep track of how frequently Google visits your website, is to examine your crawl stats in Google Webmaster Tools.
Bottom line: If you notice that your page is still appearing in Google’s search results even with the “noindex” tag, it’s probably because Google hasn’t crawled your site since you added the tag. You can request that Google recrawl your page using the Fetch as Google tool.
Also, note that some search engines’ web crawlers might interpret these directives differently than Google does, so it’s possible that your page might still appear in results from other search engines. But for Google, it’ll work just fine — once it does get around to crawling your website.
Regardless, you’ll be able to sleep a little easier knowing you’ve ultimately made your website a better place for your marketing.
What other tips do you have for de-indexing webpages, and when doing so would be useful for marketers? Share your thoughts in the comments.

![]()

