Snapchat, the one-to-one messaging app with more than 150 million daily active users, has earned a reputation for fast growth and innovation.
But despite its success, it isn’t the most user-friendly app I’ve ever played around with. Many of its best features are so buried within the app that a lot of people don’t even know they exist. In March 2016, Snapchat added even more features in their release of a new version, and some of these features have totally reshaped how people use the app in the first place.
For example, did you know that you can use Snapchat to make a live video call? Or that you can add emojis to your Snapchat videos — and make it so they move and scale with specific objects? What about the trick where you can save data by turning the app on to “travel mode”?
There are a whole lot of cool things you can do with Snapchat that you may not have known about. But before we jump into them, it’s important that you know the basics. For more on how to use Snapchat — as well as a look at how HubSpot uses the platform — check out this post.
Already have the basics down? Read on for some more advanced tips and features.
Note: Before getting started, make sure you’re operating on the latest version of Snapchat. At the time of posting, the latest version is 9.33.0.0.


15 Hidden Snapchat Hacks & Features
1) Use Snapchat for voice and video calls.
One of the biggest changes Snapchat made during its most recent update in March 2016 was the addition of a voice and video chat feature. There are two ways you can use voice and video chats: By sending 10-second recordings (of your voice or a video of you), or by “calling” them to start a live voice or video chat lasting any amount of time.
The voice and video call functionality is located within Snapchat’s chat feature, so you’ll need to open up a chat conversation with someone to begin. If you’ve updated your Snapchat app, you’ll see the phone icon and a video icon below the chat box.

To leave a 10-second voice or video message, hold down on the voice or video call icon and it will begin recording immediately. When you release the button by picking your finger up from the screen, the recording will stop and send immediately with no do-overs. In other words, make sure you’re ready to record and send the voice or video message before you begin.
To start a live voice or video call, just tap the voice or video call icon and it’ll begin ringing the other person immediately. If they don’t answer within a few seconds, you’ll see a pop-up notification asking you if you’d like to send a voice or video message instead. These voice and video messages are identical to the 10-second voice and video messages described above.
Here’s a GIF showing what it looks like to live video call another user:

Note: Voice and video chat will only work if both you and the person you’re trying to call have updated their app to the most recent version.
Also, remember that there’s no verification once you tap or hold down on one of the icons — it’ll start ringing or recording right away. (I learned this the hard way when I tapped the video icon accidentally.) Otherwise, it’s a very intuitive and easy-to-use functionality.
2) Turn on two filters at once.
Can’t choose between giving your photo a blue hue and letting your friends know you’re going 0 mph? Thankfully, you don’t have to make that difficult decision. You can use both filters at the same time with a very simple trick.
To add a second filter to a photo, all you have to do is hold the screen with one finger and swipe left or right with another to find your second filter. (To add that first filter, just swipe your finger left or right over your photo to rotate among them until you settle on one.)
3) Add, resize, and rotate emojis and stickers to your photos.
If you’re looking to dress up your Snapchats outside of the text box, you can add an emoji (or five) and place them anywhere you want on your photo or video.
In addition to the emojis you’re probably familiar with, Snapchat added 200 new stickers in May 2016 that are similar to the stickers that are so popular in other messaging apps like Facebook Messenger. These new stickers are super cute — everything from cacti to snarky kittens to walruses celebrating Hump Day.
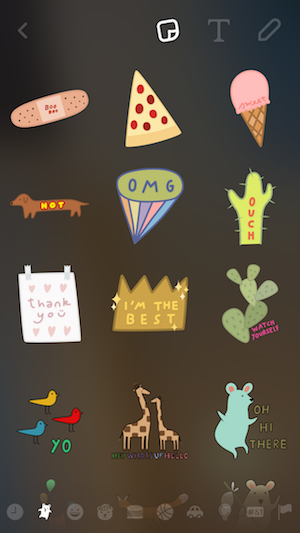
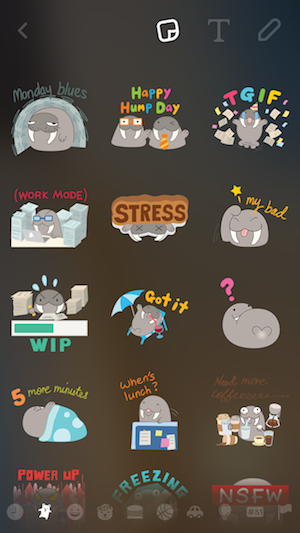
To access the emojis and stickers, start by taking your photo in Snapchat. Then, tap on the folded paper icon on the top of your screen next to the “T” text icon. Scroll through the available stickers and emojis until you find the one you want. Tap on it to add it to your photo, and then use your finger to move it around.
You can use two fingers to rotate it or resize it by pinching and zooming. Add as many emojis and stickers as you’d like.

To delete a sticker or emoji, simply drag it to the trash icon, which appears in place of the folded paper icon once you hold your finger down on the emoji in question.
Another creative way to use emojis on Snapchat? Create your own filters using some of the more transparent emojis by enlarging them until they cover the whole screen.

4) “Pin” emojis to objects in your videos.
In addition to adding stationary emojis and stickers to your Snapchat videos, you can also “pin” — or attach — emojis and stickers to different objects in your video. This allows the emoji to automatically move, rotate, and scale with whatever object you pinned it to.
To “pin” an emoji or sticker to an object in a video, start by recording your video in Snapchat first. Then, tap on the folded paper icon on the top of your screen, located to the left of the “T” icon.
Scroll through the available emojis and stickers until you find the one you want. Tap on it to add it to your photo, and then use your finger to move it, and hold it in one place above an object to “pin” it to that object.

5) Make your videos go in fast-forward, slow motion, or rewind.
Snapchat recently added features for videos allowing users to make them go in fast forward, slow motion, or rewind. These features work just like a filter, so to access them, record the video first and then swipe sideways to find them.
Here’s how they work:
- Snail icon = slow motion
- Rabbit = fast-forward
- Backward-facing arrows = rewind

Image Credit: TechCrunch
6) Draw in black or white.
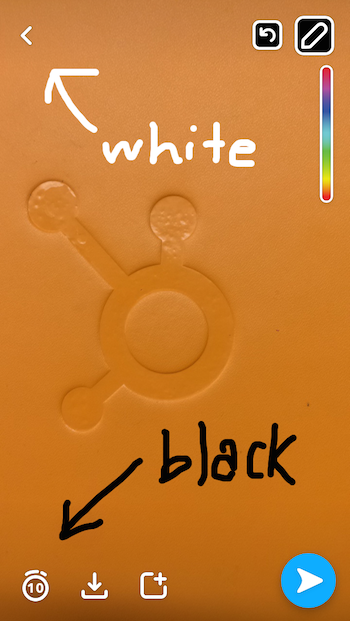
You may have noticed that the color palette in Snapchat’s drawing tool doesn’t offer black and white — but that doesn’t mean that you can’t access both of those colors. All it takes is a few quick finger maneuvers.
To access the available colors, you’re used to holding your finger down on the color palette and dragging it up or down. But to access black and white, you’ll need to drag it toward the upper left corner of your screen (white) or the bottom right corner of your screen (black).
7) Change the color, size, and orientation of your text.
Think you’re limited to white text? Turns out you can actually change the color of your text to whatever you want, including black (see previous tip).
To change the color of your text, start by taking your photo or video, then tap the “T” icon at the top of your screen. Tap the “T” icon again to make the text larger and remove that shadowed background, and then tap the text itself to open up the color palette. Drag your finger along the palette to change the text color.
To change the orientation and/or size of the text, use two fingers to rotate it or resize it by pinching and zooming. You can move the text around to wherever you want on the screen simply by holding your finger on the text and moving it around.


8) Make your text fit neatly in one line.
If you’re anything like me and hate when your text awkwardly goes just over one line, rest assured: You can actually resize your text so it fits neatly into a single line (or however many you’d like).
To resize your text, tap the “T” icon at the top of your screen, then tap on the text to get into text editing mode. Next, use two fingers to pinch-and-zoom to resize it while it still spans the width of your screen.

9) Exceed Snapchat’s text limit.
Even though Snapchat recently extended their text limit on Snapchat to 33 characters, that’s still not always enough. Luckily, there’s a hack that’s been going around for a little over a year now for how to exceed Snapchat’s character limit.
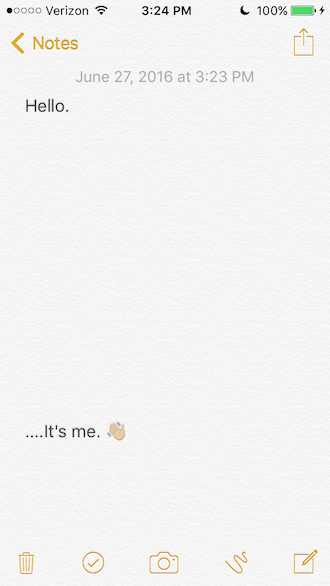
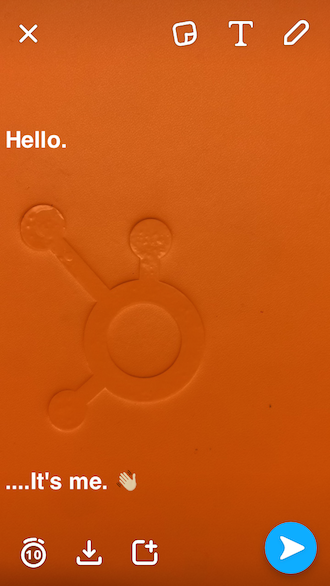
To add extra text, you just need to type your long message into your Notes app (a native app for iOS users), copy it, and paste it into the text field in Snapchat. Alternatively, you can copy a range of blank text in your Notes app and paste it into the text field in Snapchat, and then write in your text.
10) Turn on “travel mode” to save data.
When I first started using Snapchat on a regular basis, I noticed right away that it was draining my battery faster than any of my other social media apps. Thankfully, Snapchat actually has a built-in feature to help conserve your data, in the form of “travel mode.”
When you set your Snapchat app to travel mode, snaps and stories won’t download automatically. Instead, you can choose when you want to load a snap or a story.
To turn your Snapchat app to travel mode, go to settings, which you can access by opening Snapchat, tapping the ghost icon in the top center of the screen, and then tapping the gear icon in the top right-hand corner of the screen.
![]()
![]()
Once you’re on the settings page, tap “Manage” under “Additional Services” and toggle “Travel Mode” on.

11) Create your own geofilter.
In February 2016, Snapchat started letting anyone — whether you’re a business or an individual — create custom “on-demand geofilters.” On-demand geofilters are filters users can add when they take photos and videos from specific locations.
There are two different kinds of geofilters: a personal geofilter and a business geofilter.
- A personal geofilter promotes a personal event or location like a birthday party, wedding, graduation party, and so on, and you can set them for up to 30 days. They can’t include marks, logos, branding, or businesses.
- A business geofilter promotes a business or a brand, like for an upcoming sale, an ad for a certain location, or something along those lines. Business Geofilters need to meet Snapchat’s Business Guidelines.

Image Credit: Snapchat
To create them, you’ll need to upload an image with a transparent background (or use one of Snapchat’s premade templates), upload it to http://geofilters.snapchat.com, pick a date, time, and location for it, and submit it to Snapchat along with your payment. The Snapchat team promises to review submissions within one business day.
The announcement said this feature is available in the U.S., U.K., and Canada for now, with new locations coming soon. You can learn more about how to use them on Snapchat’s website here.
12) Add music to your videos.
Here’s a small tip that can make a big difference in your Snapchat videos. After all, the folks at Snapchat claim that sound is a big part of what makes Snapchat videos so appealing. In June 2016, they claimed that two-thirds of Snapchat’s 10 billion daily video views are watched with the sound on.
Adding music can add a unique touch to your Snapchat videos, and it’s simple to do. All you have to do is play the song you want through your favorite music player app (like Spotify or iTunes), and then record the video on Snapchat while the song is playing. The video recorder on Snapchat will pick up the music and it’ll automatically become part of your video.
13) Turn the sound off in your videos.
Like I said before, sound is a big part of what makes Snapchat videos unique. Although the default settings for video on both Facebook and Twitter have the volume turned off, Snapchat has done the opposite: its default setting has the volume on.
“The nature of Snapchat, in terms of user-experience, plays into the prominence of sound on the platform,” said Brian Nguyen, group communications strategy director at Droga5. “Users on Snapchat simply expect sound, whereas on Facebook, they don’t.”
But if you’d rather not have sound in your video, it’s helpful to know that there is a way of turning it off. This might be best if you’re recording a video that has unnecessary, loud, or jarring noises that don’t add to the video in a way that you want them to.
To turn sound off on your video, first record your video like you would normally for a Snapchat video. Then, tap the microphone icon on the bottom left-hand side of your screen once so that the sound waves are replaced with an X.
Before:

After:

14) Save a Story as a video clip by downloading it.
Anyone might want to save a Snapchat Story to view later, but this is especially true if you’re working on Snapchat content for your business so you can show your team the Stories you’ve put together and view them later to see what styles worked well. You can save Stories by downloading them to your device. (From there, I’d recommend emailing it to yourself so you don’t accidentally lose it.)
To save an entire Story as a video clip, open up Snapchat and go to the “Stories” view, which you can do by swiping right from the default camera view. Your Story will appear at the top.
Tap the three dots on the far right-hand side of the screen to bring up the download button to the left. Then, tap the download button to save the entire story.
To save one Snap on your Story as a video clip, open up Snapchat and go to the “Stories” view, which you can do by swiping right from the default camera view. Your Story will appear at the top.
Then, tap on your Story and swipe up on the Snap you want and hit the download button at the top of the screen.
15) Delete single snaps from a Story.
If you’ve published a snap to your Story, you can still go back to it and delete it at any time — even if you’ve published other snaps after it.
To delete a snap form a Story, simply open up Snapchat and go to the “Stories” view, which you can do by swiping right from the default camera view. Your Story will appear at the top. Swipe up on the Snap you want to delete and hit the delete button.
Image Credit: Snapchat
There you have it. We hope these tricks and features help you use Snapchat to connect with your friends, fans, and even customers in a way that’s low-cost, but highly personal and engaging.
Happy snapping!
What other Snapchat features can you add to this list? Share with us in the comments.

![]()

