 We’ve all been there before. You’ve written a great blog post, and you’ve plopped a featured image in there to represent the post on social media, your blog’s main page, and so on.
Then, you hop on your social media accounts and paste the link into a new post. You’re all ready to share it with your network when you notice one glaring issue: The social networks are pulling the wrong thumbnail image! Or worse, none at all. Talk about a pain in the neck.
Not only is this annoying — you were so close to being done — but a bad thumbnail image (or no thumbnail image) could seriously hurt your post’s performance on social. Images are a key play for garnering engagement on your social pages, and data shows they help generate more likes, shares, and comments. For example, posting images on LinkedIn results in a 98% higher comment rate. But that image needs to be the right image — not your logo; not a cut-off picture of your call-to-action button; not some other image randomly pulled from the page.
So, how do you ensure each of your social networks pulls in the image you want it to?

The answer lies with something called the Open Graph Protocol, which Facebook created in 2010. LinkedIn has since adopted the same protocol, while Twitter uses its own open graph system that’s based on the same conventions — although Twitter accommodates the Open Graph protocol if you already have it on your site. Also note that Twitter only automatically pulls in information from a link when you use Twitter Cards, not for regular tweets.
What Is the Open Graph Protocol?
When you share a website or an article on Facebook or LinkedIn, or via Twitter Cards, you’ll notice each of these social networks automatically pulls in a few pieces of information into your social post: the website’s title, an image, the URL, and a short description. The Open Graph (OG) Protocol is the process of extracting all this information from a web page and pulling it into a social media post. But where did each social network find that information?
That’s where Open Graph (OG) tags come in: When you put OG tags in the head section of a web page, social networks have a much easier time finding the correct information for each part of the social post. If your web page doesn’t have OG tags in the code, then they’ll take a guess on where to find the right information. Usually they’ll do OK with the title, URL, and description, but they often have trouble picking the right image. OG image tags tell social networks exactly which image to pull.


Good news for HubSpot and WordPress users: If you use HubSpot for blogging, your social networks will pull in the featured image automatically — just make sure you designate a featured image in each of your blog posts. (Pro tip: Try uploading your featured images to the COS as at least 610 pixels wide, which ends up looking better on Facebook, Twitter, and LinkedIn. Although LinkedIn’s photo dimensions ask for a small image, the COS should resize it automatically.) If you use WordPress, you’ll need to install this plugin or one like it, but then you’ll be set to go.
This post is for those of you who don’t use a content management system (CMS), as you’ll need to do it manually for each page on your site. We’ll show you step-by-step instructions for how to manually optimize images for social posting on the top three social networks for sharing content: Facebook, LinkedIn, and Twitter.
Here’s what a Facebook link post looks like:
To ensure Facebook pulls the right image from your blog post into your Facebook posts, you’ll need to first optimize the image size for Facebook and then add the proper OG tags to your website.
Optimizing the Image Size
Required: Facebook requires you to use an image that’s at least 200 x 200 pixels.
Suggested: Although that’s the absolute minimum, Facebook advises that you use an image that’s at least 600 x 315 pixels. For the best dispay on high-resolution devices, they suggest choosing an image that’s at least 1200 x 630 pixels.
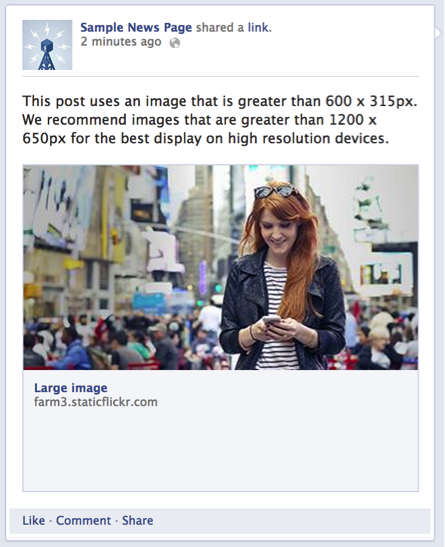
Image Credit: Facebook
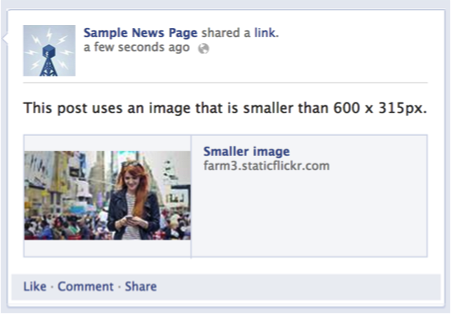
If your image is smaller than 600 x 315 pixels, it’ll still display in your post, but it’ll be much smaller:
Adding the Open Graph Tags
If your page is static and you don’t use a CMS like HubSpot, you’ll need to manually add OG tags to each of the pages your blog posts are on. The tags are meta data, so you need to add them to the head section of the page your blog post is on. (If you don’t manage the code on your site, you’ll need to ask your web developer for help.)
Step 1: Copy this tag:
<meta property=“og:image” content=“http://example.com/picture.jpg ” />
<meta property=”og:image:width” content=”180” />
<meta property=”og:image:height” content=”110” />
Step 2: Replace the example image URL, highlighted in red, with your selected image’s URL. Replace the height and width numbers, highlighted in green, with the correct dimensions of your image, keeping in mind Facebook’s image size requirements.
Step 3: Copy and paste the resulting code snippet into the HTML head section of your page.
Step 4: (Don’t worry about this step if the web page you’re working on has never been published before.) If you’ve previously published this web page without tags, or if you publish the page and then realize you messed the tags up and need to adjust them, you’ll need to run the URL through Facebook’s debugger once you make any changes. This is because Facebook caches its shared pages — so if you don’t refresh the cache, the thumbnail won’t be corrected.
That’s it! Now, when you post a link to your article to Facebook, the Open Graph Protocol will read the OG:image tag and display the image you point it to. (Learn more about OG tags for titles, descriptions, and more on the Facebook dev blog.)
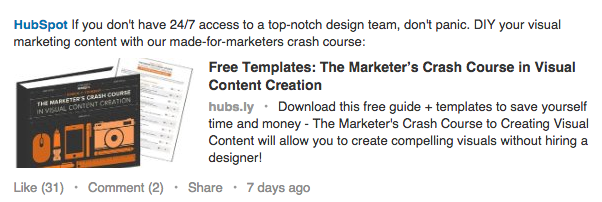
Like Facebook, LinkedIn also uses the Open Graph Protocol. So when you share a link with your LinkedIn network, LinkedIn scrapes the article for a title, images, and a URL, and then uses that information to fill our your LinkedIn post. (While they don’t explicitly say they scrape for a meta description, their algorithm does pull this in as well.) Here’s an example:
To ensure LinkedIn pulls the right image from your post to use as a thumbnail, you’ll need to optimize that image’s size and then add the proper OG tags to your website, much in the same way as you did for Facebook.
Optimizing the Image Size
Required: LinkedIn requires thumbnail images to be at least 80 x 150 pixels — if your image doesn’t meet that minimum, then they’ll automatically pull in an different image on your page that fits the right dimensions.
Recommended: They also advise you to use an image smaller than 180 x 110 pixels that is close to that aspect ratio (i.e. rectangular, rather than square). This is because they always present the thumbnail image as 180 x 110 pixels in people’s LinkedIn feeds no matter what image size you upload.
Adding the Open Graph Tags
Just like on Facebook, if your page is static and you don’t use a Content Management System (CMS) like HubSpot, you’ll need to manually add OG tags to each of the pages your blog posts are on. The tags are meta data, so you need to add them to the head section of the page your blog post is on. (Again, if you don’t have control over the code on your website, you’ll need to ask your web developer for help.)
Step 1: Copy this tag:
<meta property=“og:image” content=“http://example.com/picture.jpg ” />
<meta property=”og:image:width” content=”180” />
<meta property=”og:image:height” content=”110” />
Step 2: Replace the example image URL, highlighted in red, with your selected image’s URL. Replace the height and width numbers, highlighted in green, with the correct dimensions of your image, keeping in mind LinkedIn’s image size requirements.
Step 3: Copy and paste the resulting code snippet into the HTML head section of your page.
That’s it! Now, when you post a link to your article to LinkedIn, the Open Graph Protocol will read the OG:image tag and display the image you point it to.
Important Note If You Plan to Post to Both Facebook & LinkedIn
You might notice there’s a conflict in the required image sizes: LinkedIn requires your featured image be no larger than 180 x 110 pixels, while Facebook requires your image be no smaller than 200 x 200 pixels.
While you could technically size your featured image as close to 180 x 110 pixels as possible without going over, that would optimize for LinkedIn while resulting in a very small image on Facebook. Remember, although Facebook requires an image size of 200 x 200 pixels or larger, they recommend you don’t go smaller than 600 x 315 pixels so the image in the post is large.
Instead, according to web developer Jay Holtslander, you can include two OG tags for the same image in two difference sizes in the head section of your page using this code (and you’d replace the code in red with the URLs of your differently sized images):
<meta property=”og:image” content=”image-180×110.jpg ” /> <!– 180×110 Image for Linkedin –>
<meta property=”og:image:width” content=”180″ />
<meta property=”og:image:height” content=”110″ />
<meta property=”og:image” content=”image-600×315.jpg ” /> <!– 600×315 Image for Facebook –>
<meta property=”og:image:width” content=”600″ />
<meta property=”og:image:height” content=”315″ />
Twitter uses a system similar to Open Graph tags called Twitter Card tags. (You need to have Twitter Cards already set up in order to use Twitter Card tags.)
If you already have OG tags set up on your website, the folks at Twitter made it pretty easy for you to generate a Twitter Card without duplicating your tags and data. According to Twitter’s dev blog, “When the Twitter card processor looks for tags on your page, it first checks for the Twitter property, and if not present, falls back to the supported Open Graph property. This allows for both to be defined on the page independently, and minimizes the amount of duplicate markup required to describe your content and experience.”
But Twitter Cards look pretty similar to link posts on Facebook and LinkedIn — it pulls the title, an image, the URL, and a short description. Here’s an example:
Blogging Myth #7: “You can’t write a blog post in an hour.” http://t.co/02AEOurs7O #blogfor30
— HubSpot (@HubSpot)
January 24, 2014
To set up Twitter Card tags, you’ll need to optimize your image size and then add the proper Twitter Card tags to your website.
Optimize the Image Size
Required: Twitter requires your image to be no smaller than 60 x 60 pixels and less than 1 MB in file size. They don’t make any other image size recommendations, although they do say they’ll automatically resize images larger than 120 x 120 pixels.
Adding the Twitter Card Tags
Just like on Facebook and LinkedIn, if your page is static and you don’t use a Content Management System (CMS) like HubSpot, you’ll need to manually add Twitter Card tags to each of the pages your blog posts are on. Like the other social networks’ tags, Twitter’s tags are meta data, so you need to add them to the head section of the page your blog post is on. (Your developer can help with this if you don’t have access to your website’s code.)
Step 1: Copy this tag:
<meta name=”twitter:image” content=” http://example.com/picture.jpg”>
Step 2: Replace the example image URL, highlighted in red, with your selected image’s URL.
Step 3: Copy and paste the resulting code snippet into the HTML head section of your page.
That’s it! Now, when you post a link to your article to Twitter, it’ll properly display your desired image.

![]()

