In 2017, 71% of small businesses had a website, and 92% of businesses without a website said they’d have one by the end of 2018. Today, having a website is as necessary for a company as having a phone number.
Maybe you’re starting a new business venture or developing your personal brand. Or, maybe you’re looking to update your company’s outdated website. Whatever the case, creating a new website can feel overwhelming, particularly without technical expertise or a budget for web developers.
To alleviate any frustration you might feel, we’ve put together a comprehensive, step-by-step guide to creating a website. Best of all, you won’t need a coder, web designer, or big budget to create one — all you’ll need to do is follow the seven steps below.
How to Make a Website
- Choose your platform
- Get a domain name and web hosting.
- Choose a template for your site.
- Add pages to your site.
- Write content.
- Fill in general settings.
- Install plugins.
How to Make a Website for Free
1. Choose Your Platform
The first thing you’ll need to do when creating a website is find the right CMS (content management system) for your business. There are plenty of free or budget-friendly site builders out there, but they aren’t all created equal, so you’ll want to weigh the pros and cons before choosing one.
For instance, consider whether you need a platform that allows you to code, or whether you’d like to avoid coding altogether. You might also narrow your list if you want your website to support multiple languages. Perhaps you simply want to check out templates offered by different CMS systems, or price ranges to see which you can afford.
Check out 9 of the Best Free Website Builders to simplify your decision-making process. Once you’ve chosen the best CMS for your needs, continue to step two.
2. Get a Domain Name and Web Hosting
One of the easiest ways to appear illegitimate as a company is to shirk on paying for a domain name. If you were looking for a freelance writer, would you more likely hire from Carolineforsey.weebly.com or Carolineforsey.com? A .weebly or .wordpress extension is an indicator you didn’t pay for the full service, which might seem unprofessional or lower in quality — worst case, a consumer might wonder why you can’t afford the full service, and draw conclusions that you’re not fully established.
Fortunately, purchasing a domain name is typically inexpensive, and there are a few different domain sites you can use. Both Godaddy.com and Bluehost.com are cheap, secure, and effective options for buying a domain name, with added benefits such as SSL security and office 365.
Here’s where it gets tricky. You’ll need to choose a domain name as similar as possible to the name of your company, but with over 1.8 billion websites out there today, your company’s name might already be taken.
If your ideal domain name is already taken, consider using a different extension. I’d advise you to use one of the three most common extensions if you can: .com, .net, or .org. However, if it makes sense for your business, you might want to check out an alternate extension like .us or .shop.
Play around with it. Once you’ve chosen and paid for a domain name, you’ll usually also get personal email accounts attached, so make sure you’re happy to use your domain name as your main online identity.
3. Choose a Template for Your Site
Now, for the fun part.
On whatever CMS platform you chose, take the time to browse through templates and themes, and choose one you think best represents your brand.
When in doubt, you can’t go wrong if you choose something clean with straight lines, and a limited amount of text. If you need some inspiration, check out 20 of the Best Website Designs to Inspire You in 2018.
Ultimately, no one knows your business better than you. Take the time to consider which template would most likely appeal to your ideal demographic.
Within your CMS, you can probably use filters or search to narrow down on templates related to your industry.
It’s important your template is responsive, so your site will look the same on all devices. When considering templates, you also need to decide whether you want a static header or slideshow header, and how many pages you’ll need to fit in your menu bar. Stay away from hard-to-read fonts or flashy backgrounds that could distract a consumer from understanding your core message.
Once you’ve chosen a template and theme, take the time to customize it. Your site’s design and functionality is your chance to persuade an audience to take a closer look. It’s imperative your design makes sense to your ideal consumer and works to enhance your product’s success rather than hinder it.
4. Add Pages to Your Site
It’s important to plan exactly which pages you’ll need to include in your site. While it varies business to business, I’d guess you’ll need at least a “Home” page, an “About Us” page, a “Services/Product” page, and a “Contact Us” page.
Of course, you can choose to rearrange page topics any way you want, or combine them. If you’re unsure, check out other company websites within your industry to get ideas for how to organize your navigation bar, or which pages to include and exclude.
I might be biased, but you should probably also include a blog — you know, sometimes they come in handy.
While every platform is different, it’s typically easy to add and remove pages on whichever platform you use.
5. Write Content
This is arguably the most important step. Now that you have your pages set up, what will you put on them?
I’d suggest writing rough drafts for pages like your “About Us” page and landing page. Talk with coworkers and stakeholders — what message do you want to put out there? What tone do you want to set? Should you make jokes and be funny, or aim to be more inspirational?
If your online audience stumbled across your site, what questions would they have first?
Imagine your website is your only chance to have a full conversation with a potential customer. The landing page is the preliminary introduction, “Hey, we do XYZ.” Your “About Us” page digs deeper, “We are XYZ.” And your products or services pages are your big push to the finish line: “You want to work with us? Great, here’s how you’ll benefit.”
During this stage, it’s imperative you do your keyword research.
For instance, if you’re selling eyeglasses, and you notice “retro eyeglasses” has more monthly search volume than “vintage eyeglasses”, you might use this research to steer the direction of the content on your site.
If you’re stuck, check out competitor’s websites to gauge what other companies in your industry are doing.
6. Fill in General Settings
Once you’ve filled in your pages with the heavy-hitter content, you can still increase your search visibility by filling in gaps in your CMS settings.
Make sure you include a site title and tagline in the “Settings” of your website building platform. Go through, and check out the URLs — are those optimized for search?
7. Install Plugins
Lastly, take a look at your site and figure out what you’re missing. The best CMS platform will ideally offer all the integrations you need. Perhaps your business is ecommerce, in which case, it might be wise to install a Shopify plugin extension.
Or, maybe you want to ensure your website is secure, to protect client data. In that case, find a plugin that offers firewall protection and attacks malware or other threats.
Whatever the case, browse your plugin library and pick and choose a few you think will take the effectiveness of your site to the next level.
Once you’re ready, click “Publish”, and your site is ready for use.
How to Make a Website with Google
Google Sites is one of the simplest web builder platforms I’ve used, but with that simplicity comes less sophisticated templates and tools. I’d primarily suggest using Google Sites to make a website for a business event, for internal use amongst employees, or for your personal brand.
I wouldn’t suggest using it to host your business’s primary website since the tools and functions are limited. Even if you want a simpler site right now, you might want to expand down the road, and Google Sites could make that option difficult.
Having said that, it’s still an incredibly fast and easy option. Plus, it allows you to “share” with other Google accounts, similar to Google Docs, so you can collaborate on a site.
Take a look at the four steps below to create a free Google Site.
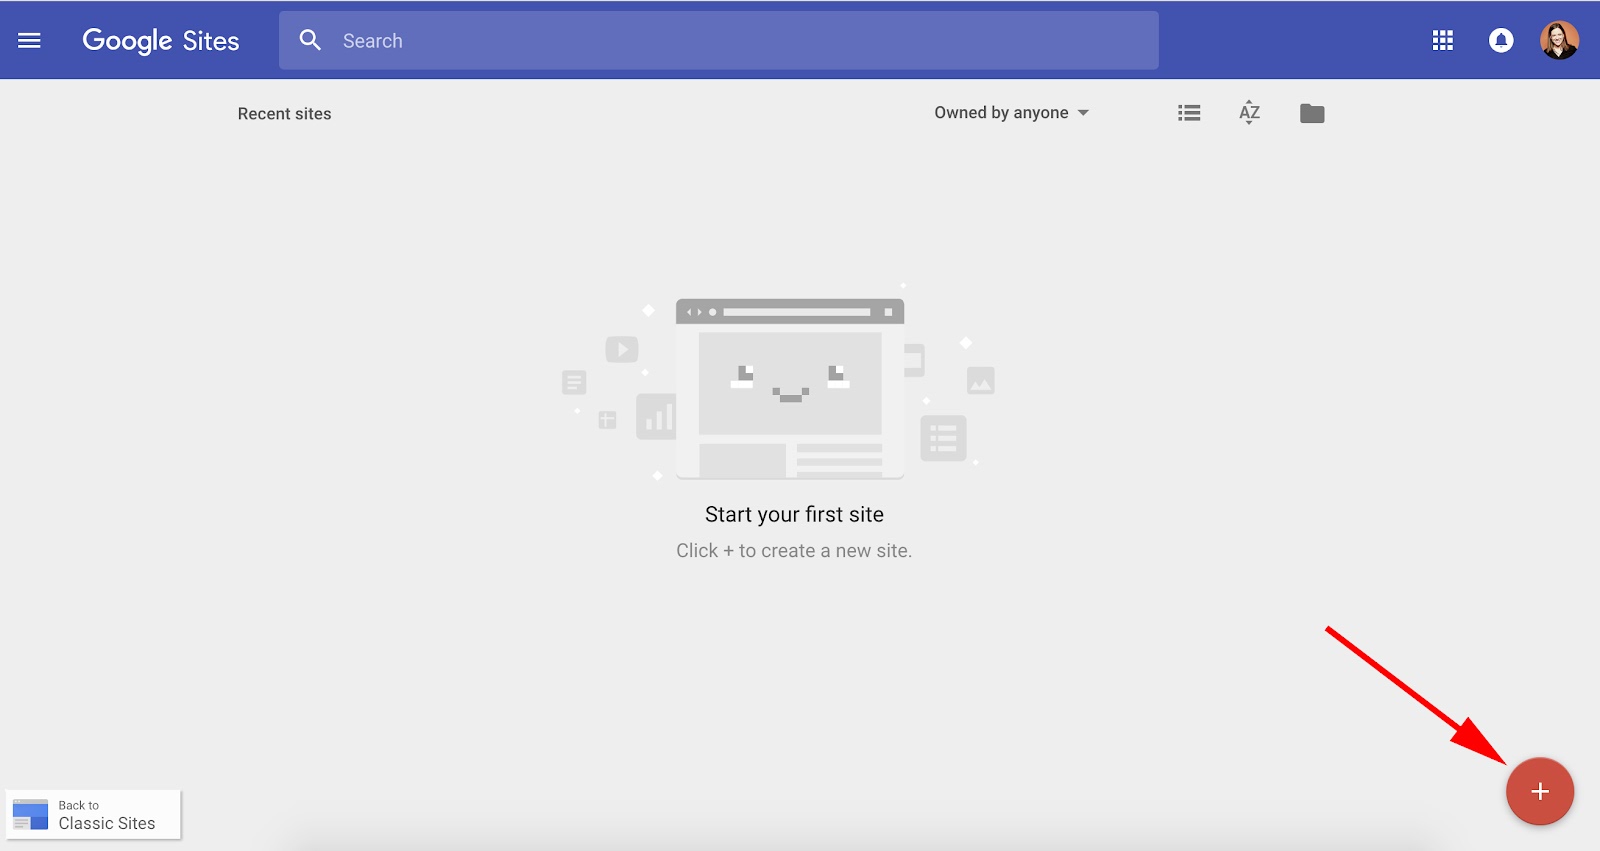
1. To create a website with Google Sites, go to
https://sites.google.com/new
. Then, click the red “+” sign in the bottom right corner.
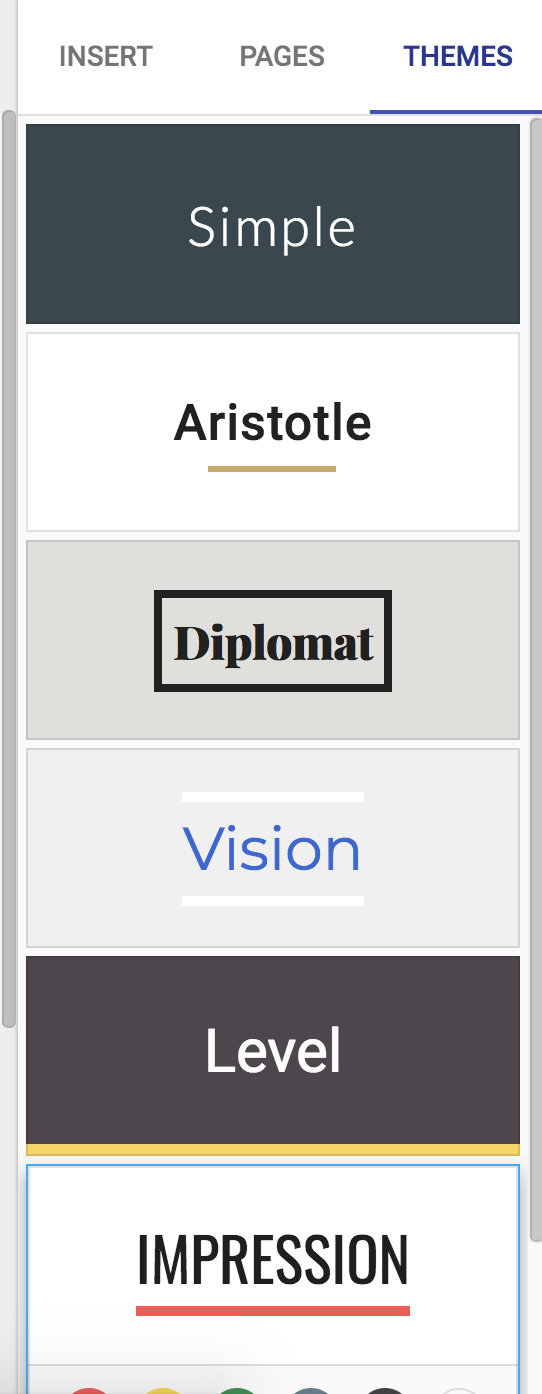
2. Next, choose a theme from your list of options on the dashboard to the right of your Google Site.
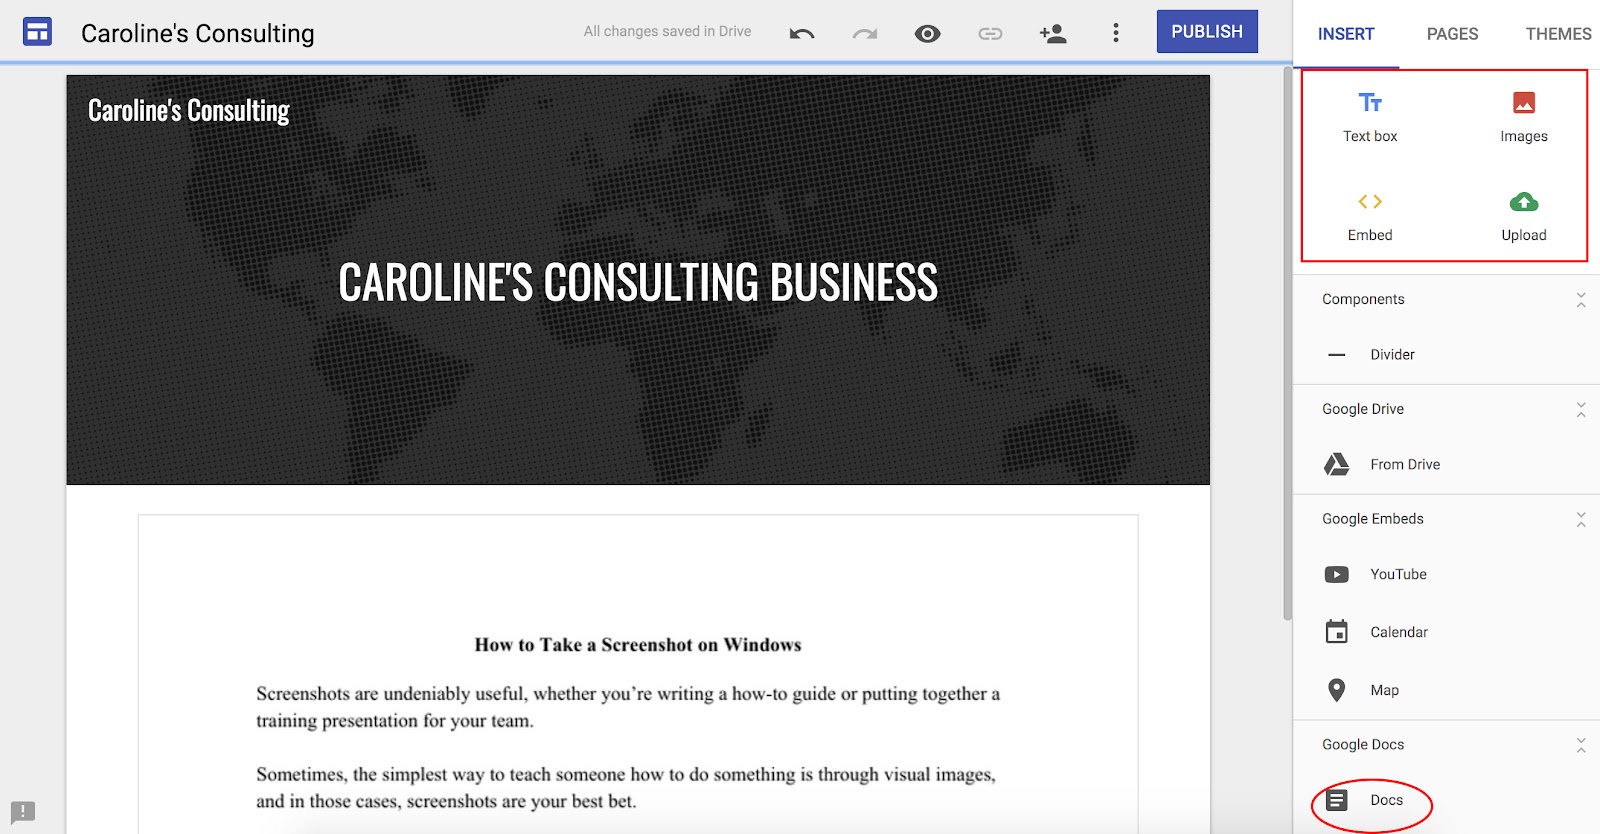
3. Now, you’re ready to add content to your site. For instance, I added the title, “Caroline’s Consulting Business”, by using the “Text box” tool in the Insert panel. The Insert panel also includes options to embed images or links, or connect to your Google Drive or Google Docs. For example, I circled “Google Docs” in the image below — I clicked that button to embed my “How to Take a Screenshot on Windows” Google Doc into my landing page.
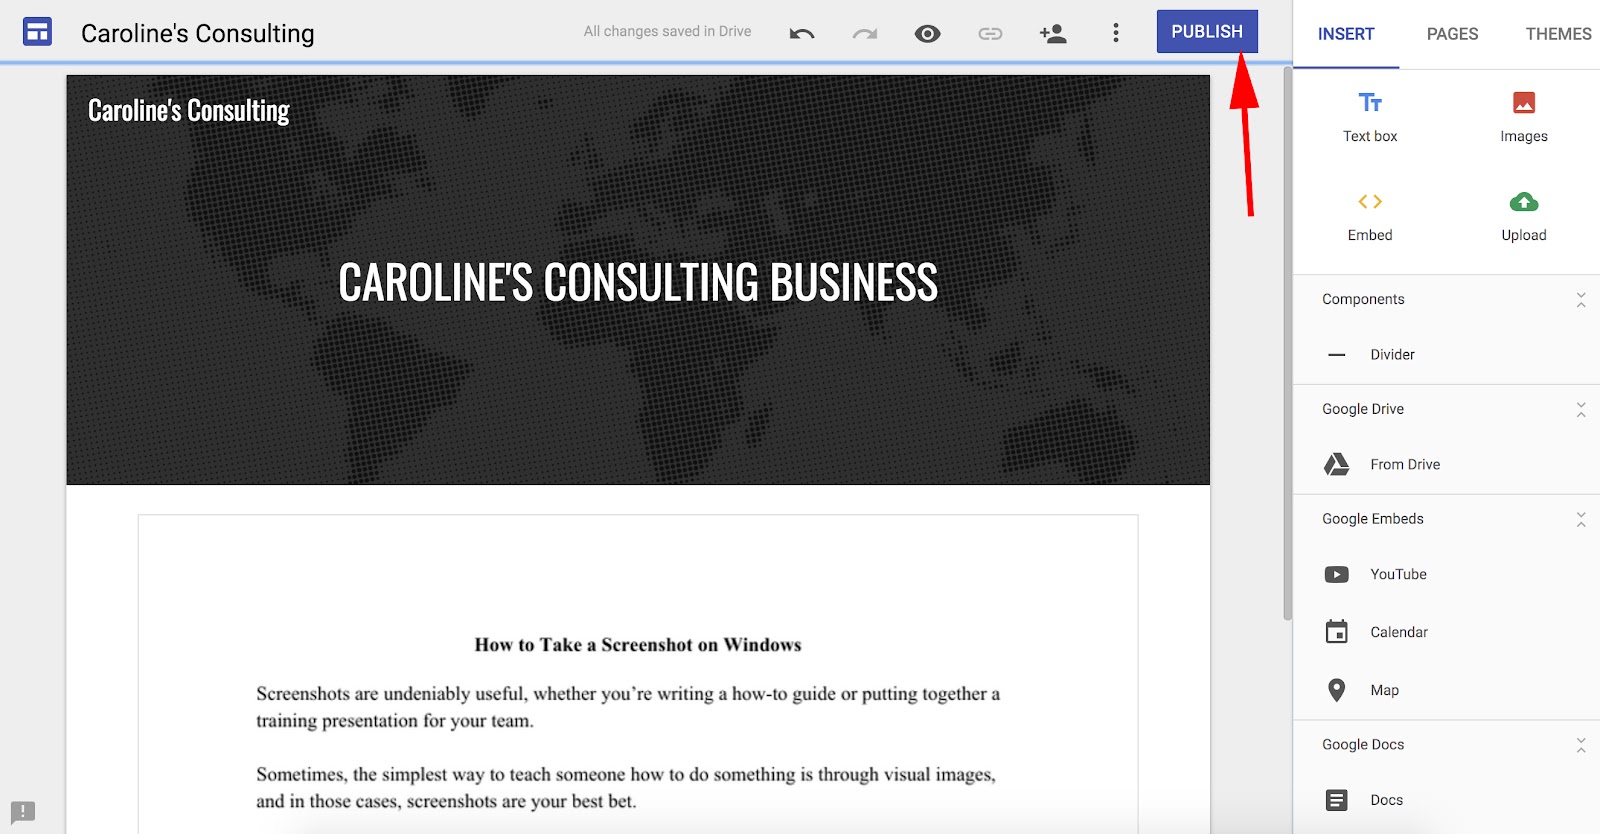
4. Once you’re happy with the way your site works, click the purple “Publish” button at the top right.
How to Make a Website on WordPress
WordPress is the fastest growing CMS, with over 500 new sites built daily. It’s one of the more popular options — it offers a large library of templates and themes to ensure you’re able to create a site that matches your brand, opportunities to mix-and-match plugins, and tools to monitor your SEO.
WordPress is easy to use and budget-friendly, and its versatility makes it a good option for anyone from a small business owner to a blogger.
If you’ve decided you want to create a website on WordPress, here’s how.
Disclaimer: For the sake of simplicity, I’m showing you how to create a free WordPress site. However, your platform might look different depending on which version you choose.
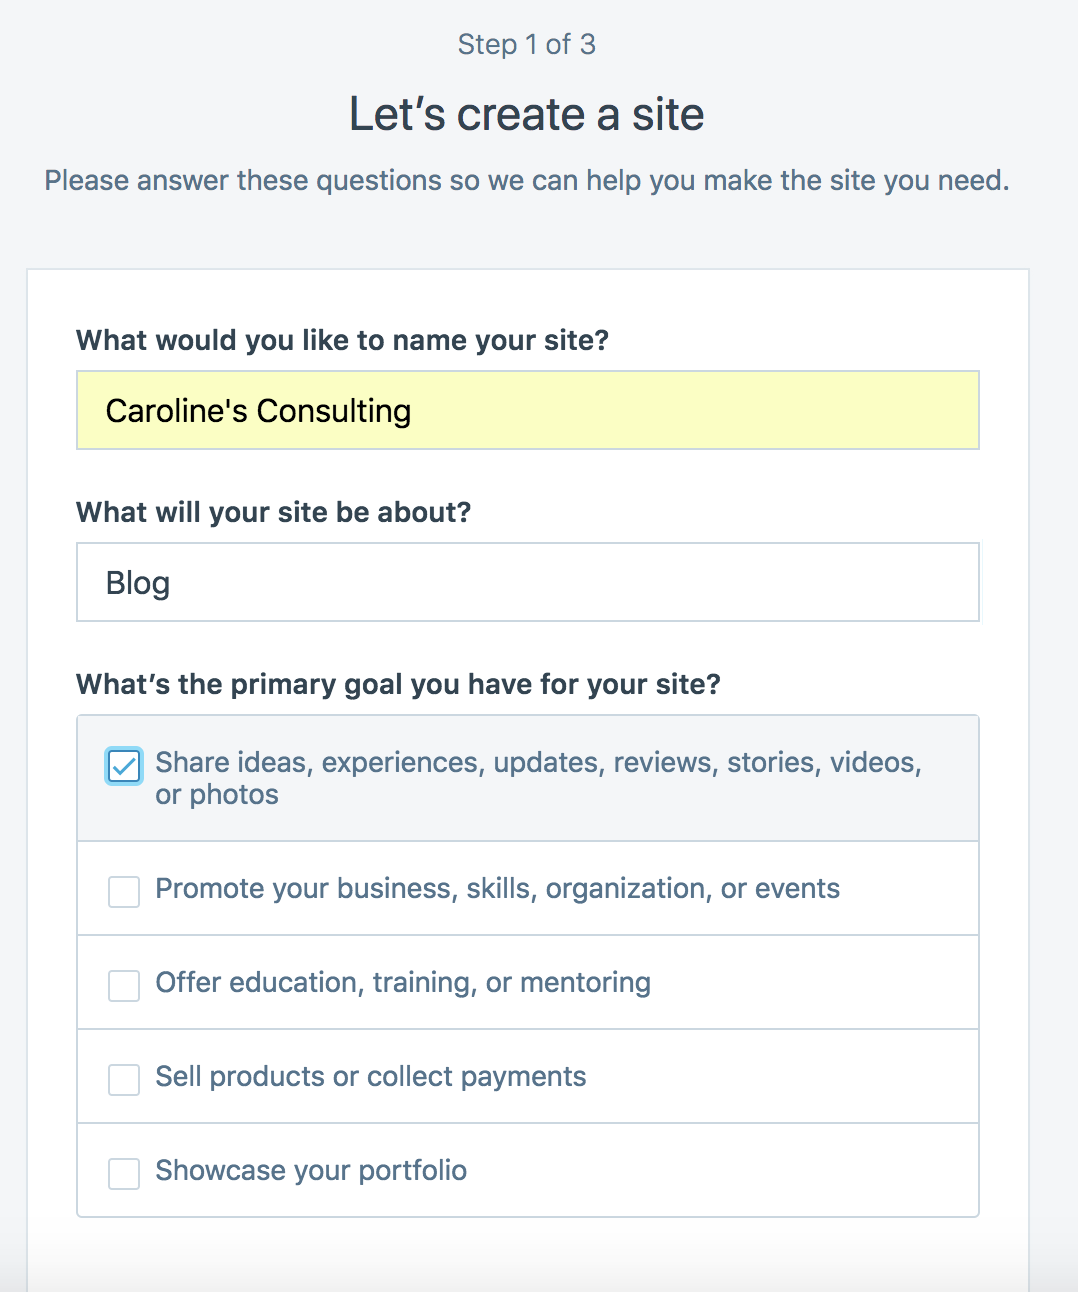
1. Go to https://wordpress.com/create/ and click the blue “Get Started” button.
2. Fill out the Step 1 form, including your site’s name, your site’s topic, and primary goals.
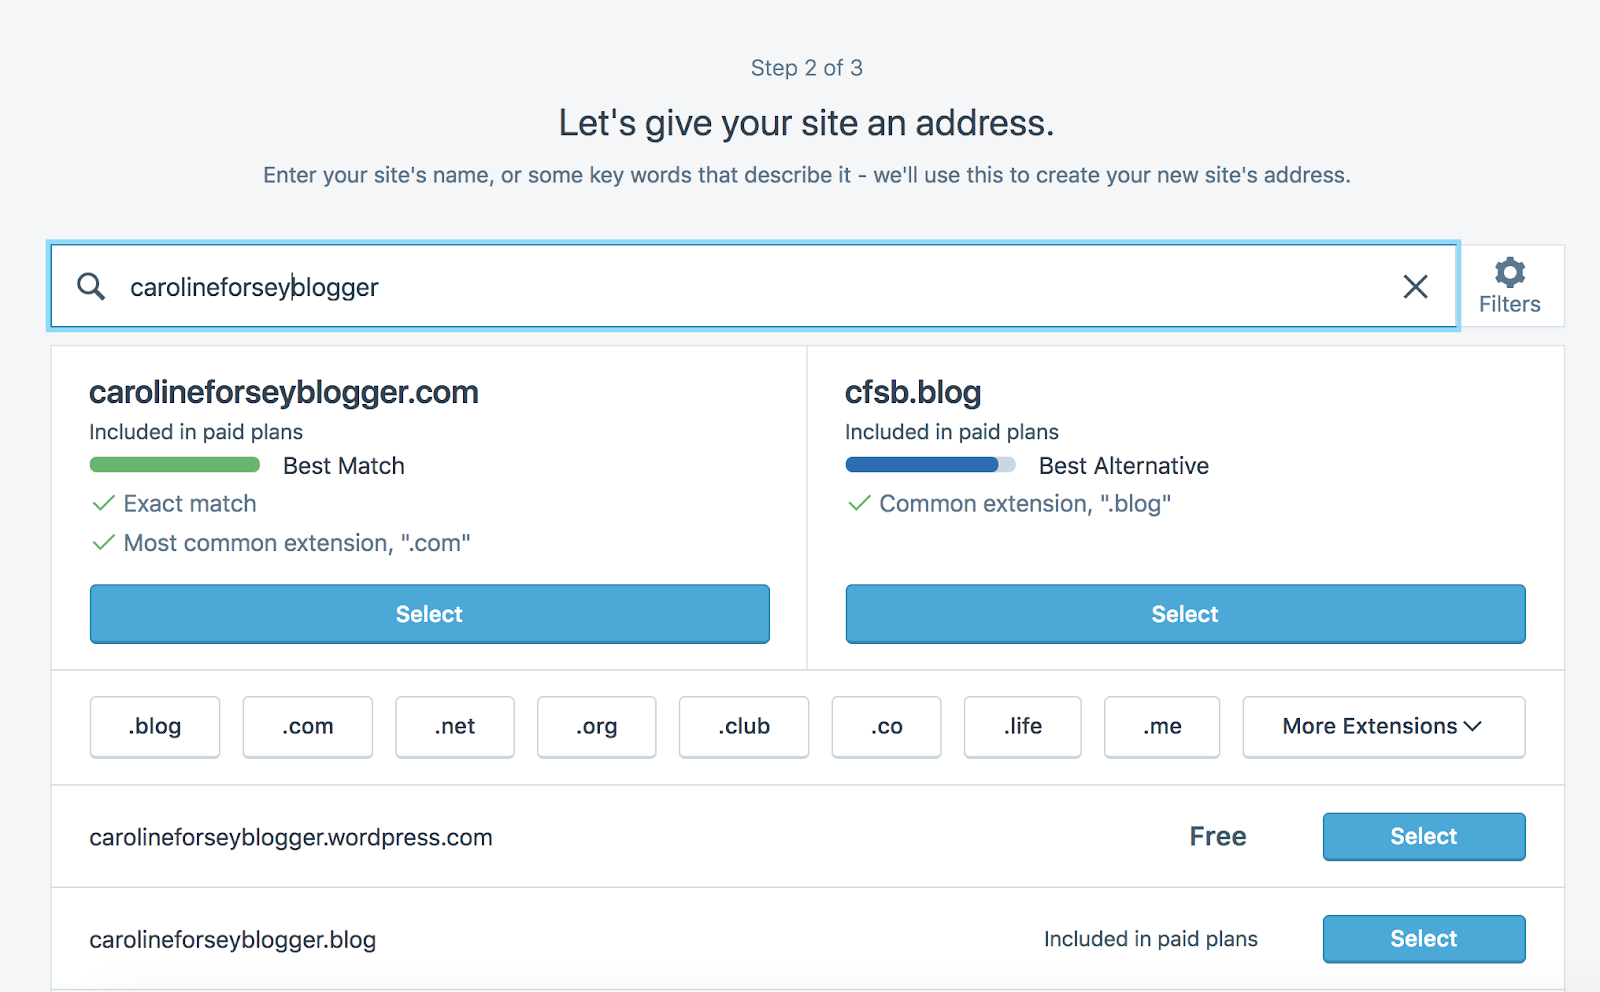
3. Fill out the Step 2 form — in this step, you’ll either input a domain you’ve already bought, or you can choose a domain straight from here. I chose the free option, “carolineforsey.wordpress.com”, but I’d highly recommend choosing a paid option to appear more official.
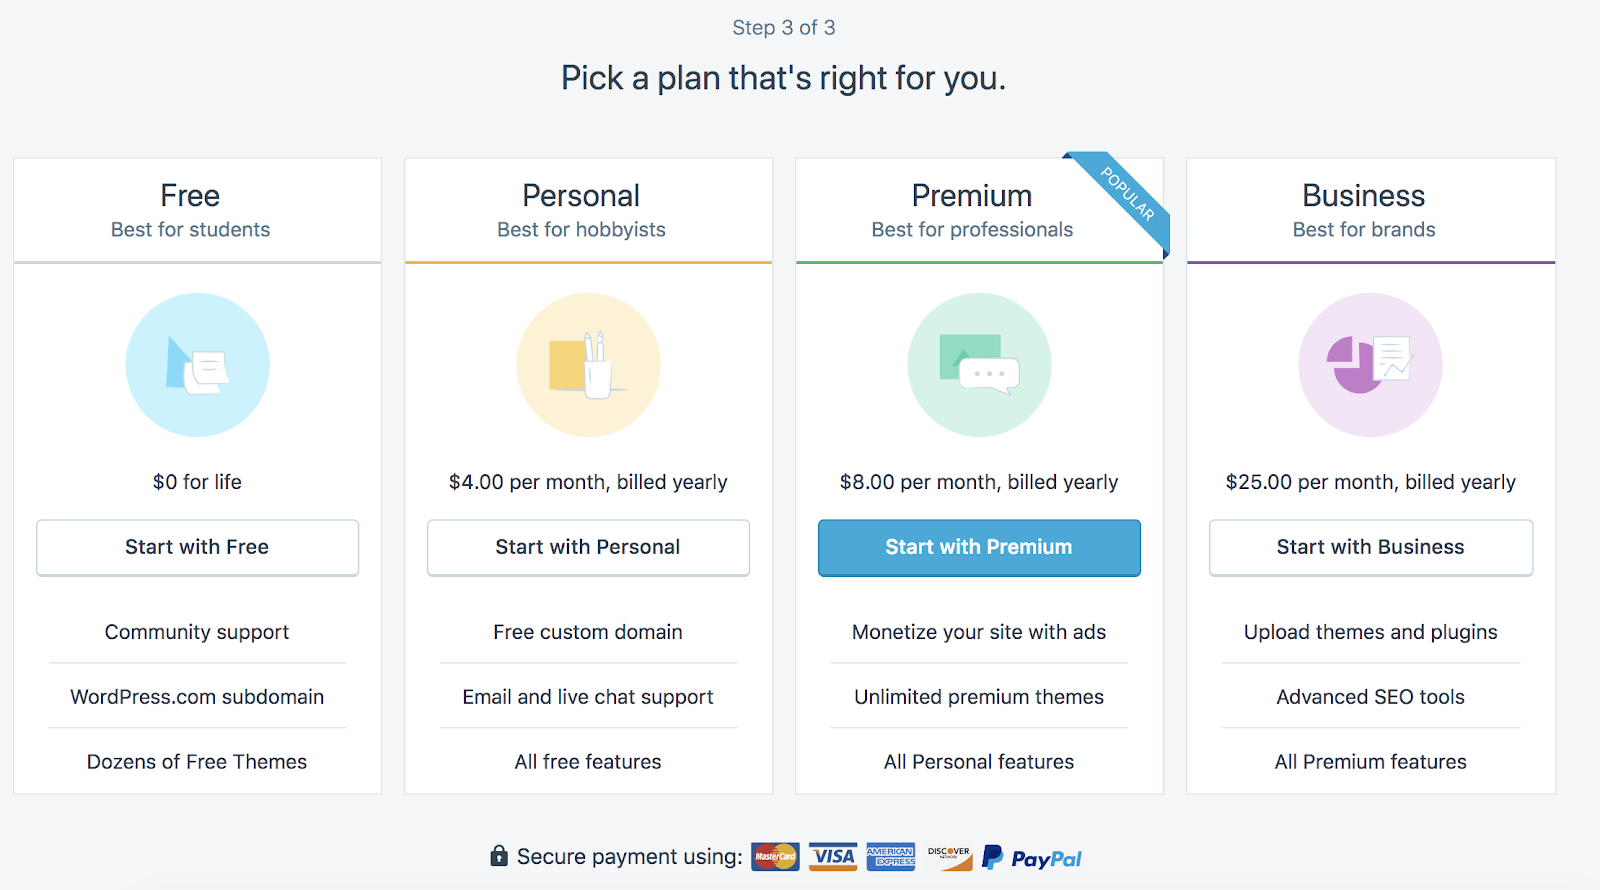
4. Choose your payment plan, depending on your goals, budget, and business type.
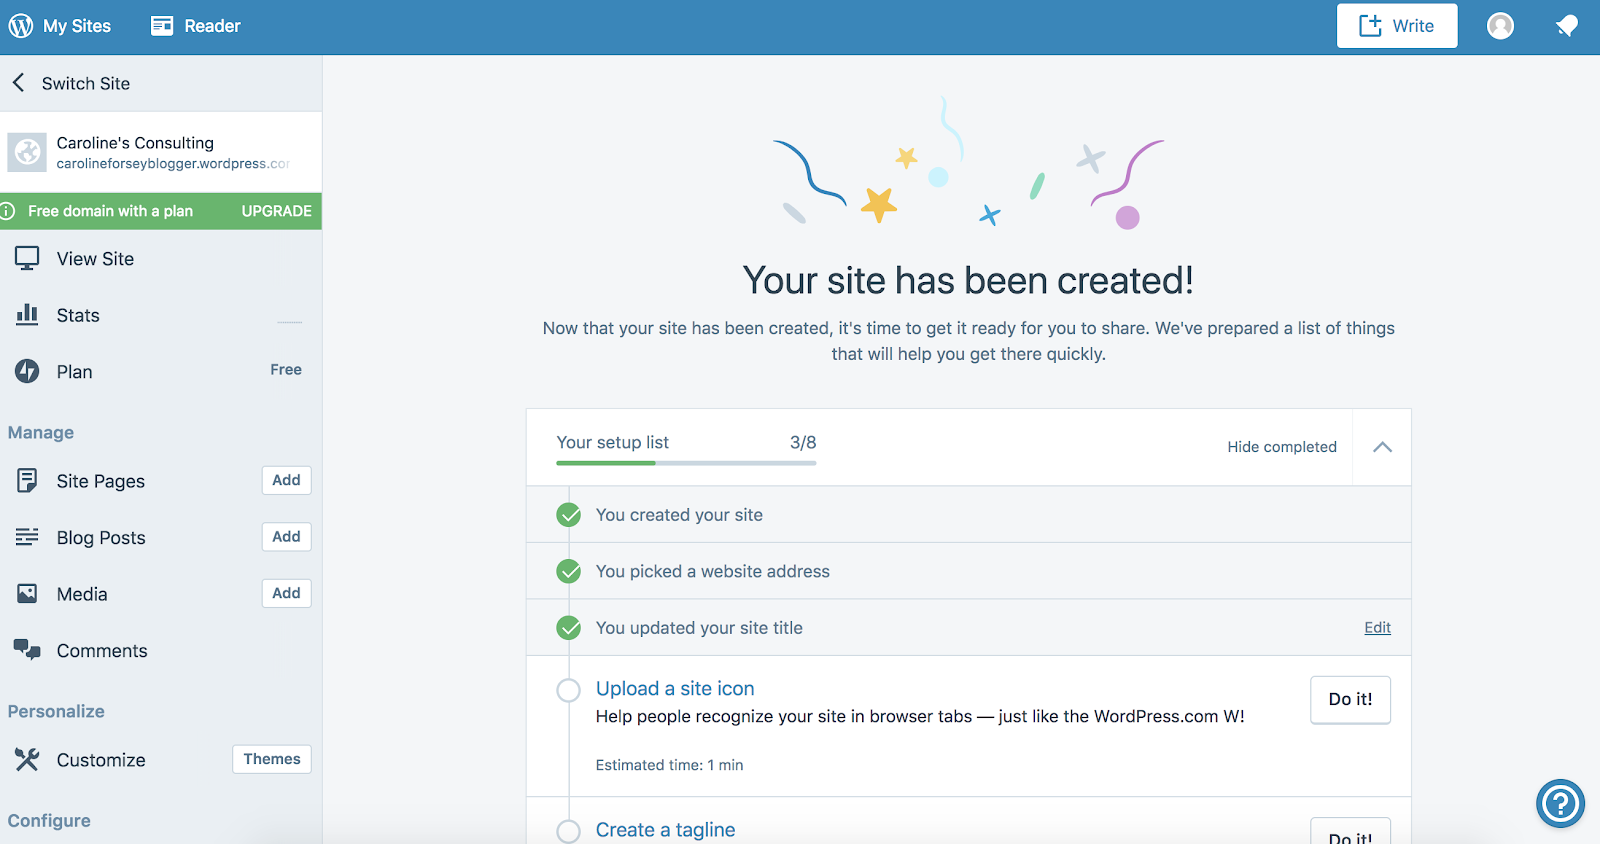
5. Now, your site has been created. You have a dashboard on your left, but you can also continue to follow the step-by-step instructions you’re offered on the landing page (i.e. “Upload a site icon”).
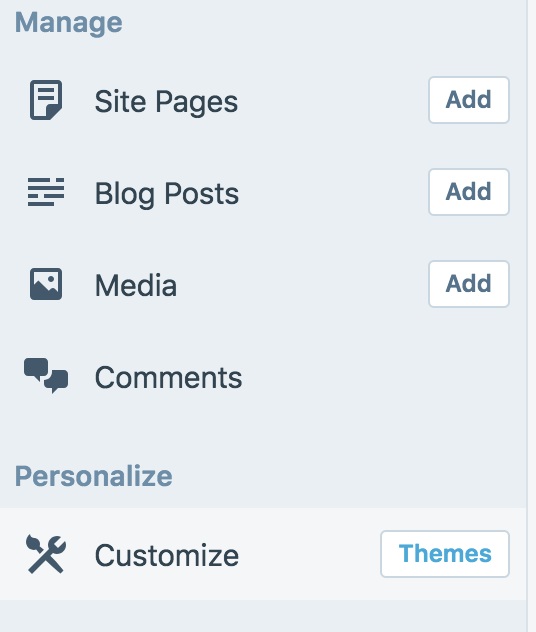
6. First, I’d suggest clicking “Themes” beside “Customize” on your dashboard on the left.
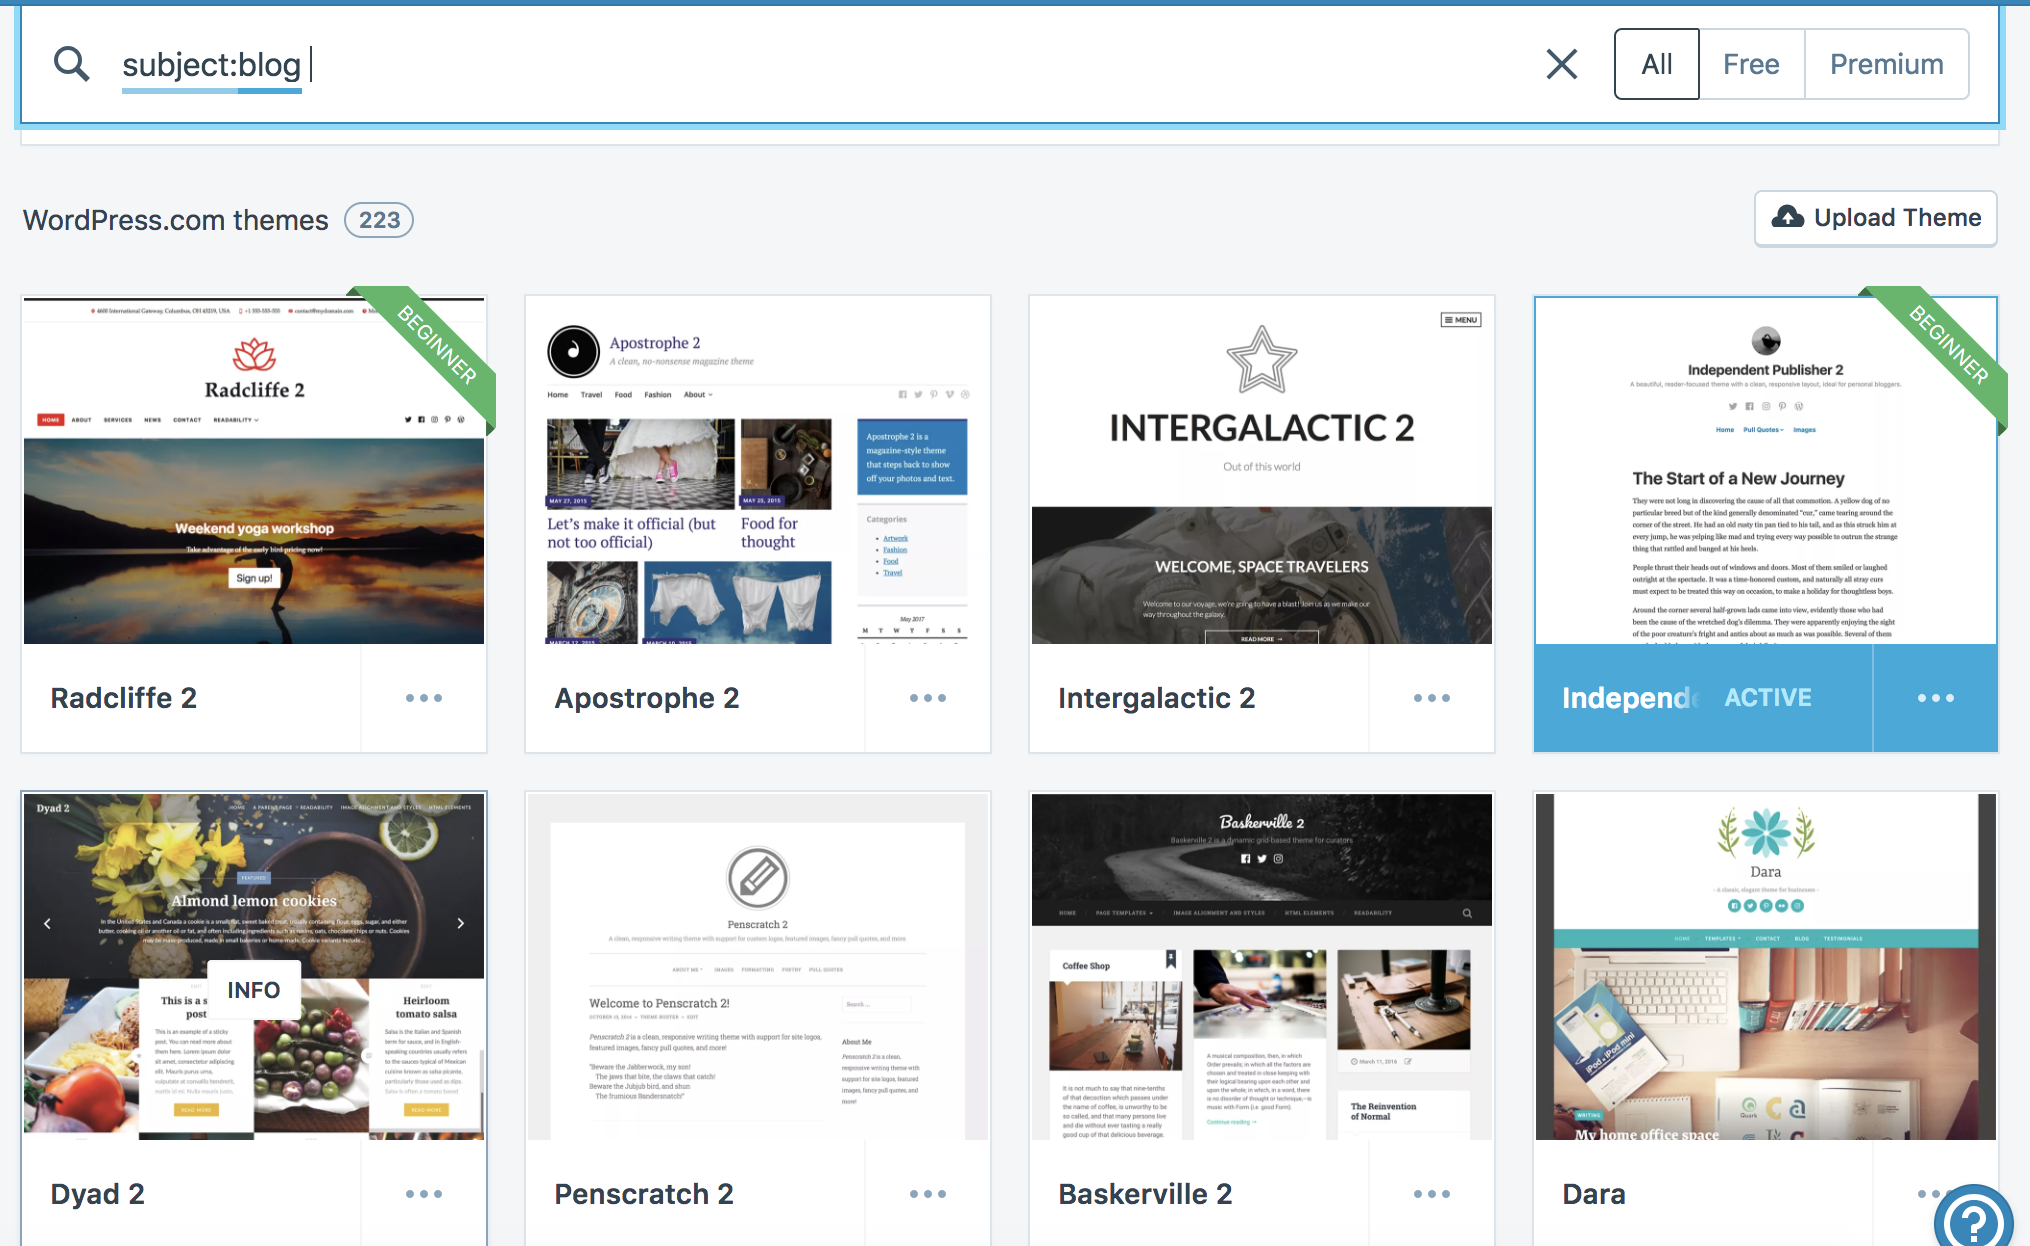
7. You can search through all the themes or search depending on your subject. For instance, I searched “subject:blog” to find themes related to my business’s topic. There are free and paid options. Select one — you can always change it later.
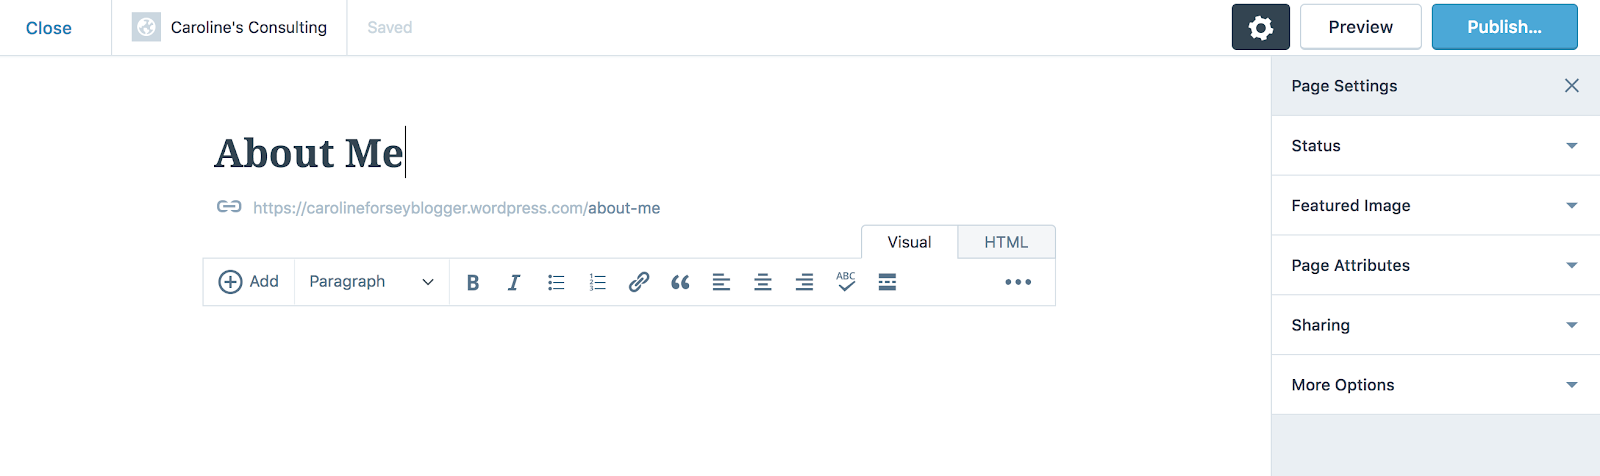
8. Next, click “Add” beside Site Pages on your dashboard, and fill out content for a page on your site. On the right, you’ll have “Page Settings”, where you can include featured images, page attributes, etc.
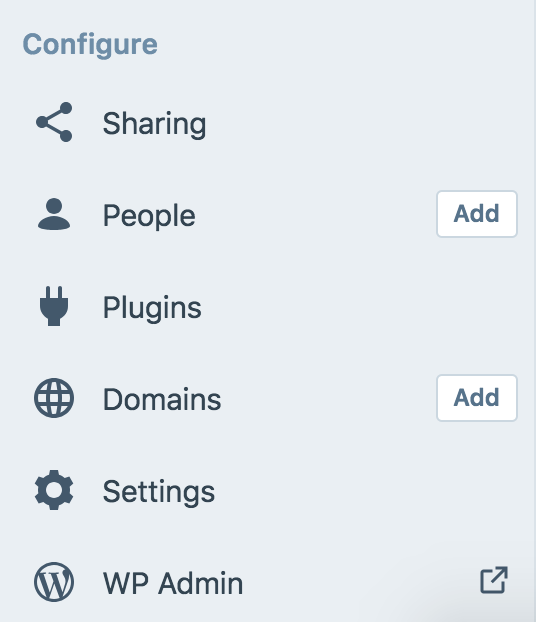
9. Lastly, explore the “Configure” section of your dashboard. This is where you’ll find plugins, settings, and options to add people to your WordPress site.
How to make a website with HubSpot
Lastly, let’s take a look at how to make a website with HubSpot. If you’re already using HubSpot’s CRM, it probably makes the most sense to build a website within HubSpot to integrate all your sales and marketing needs in one place.
HubSpot offers a variety of plugins and extensions, themed templates, and sophisticated tools for SEO analysis.
If you want to build a website with HubSpot, it’s easy and intuitive. Here’s how:
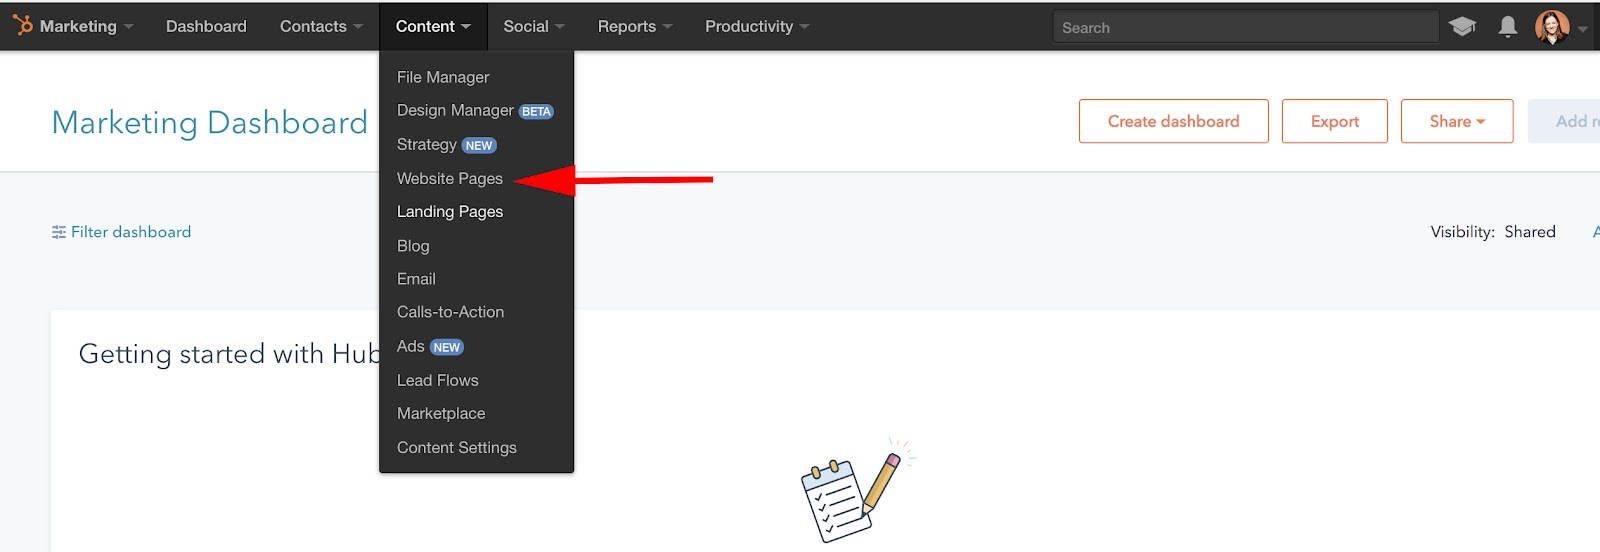
1. Within your HubSpot portal, click “Content” on the dashboard at the top of your screen. Then, click “Landing Pages”.

2. Next, click the orange “Create landing page” button.

3. Name your page, and then click the orange “Create page” button.
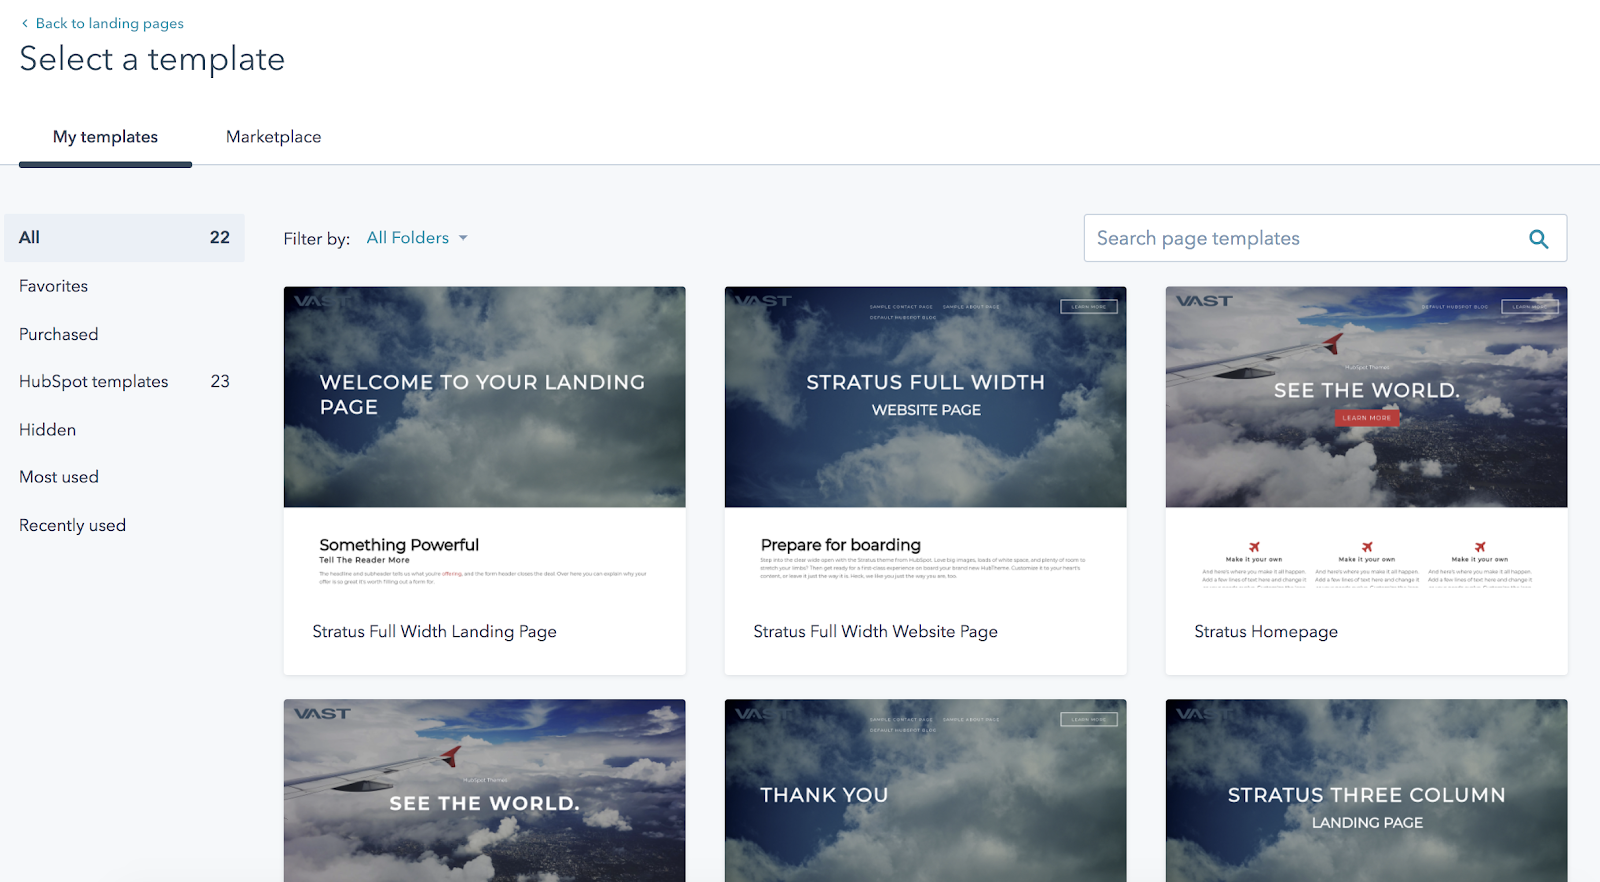
4. Now, you’ll be taken to this “Select a template” page. Scroll through your options, search page templates, or check out the Marketplace. When you’ve found a template you like, select it.
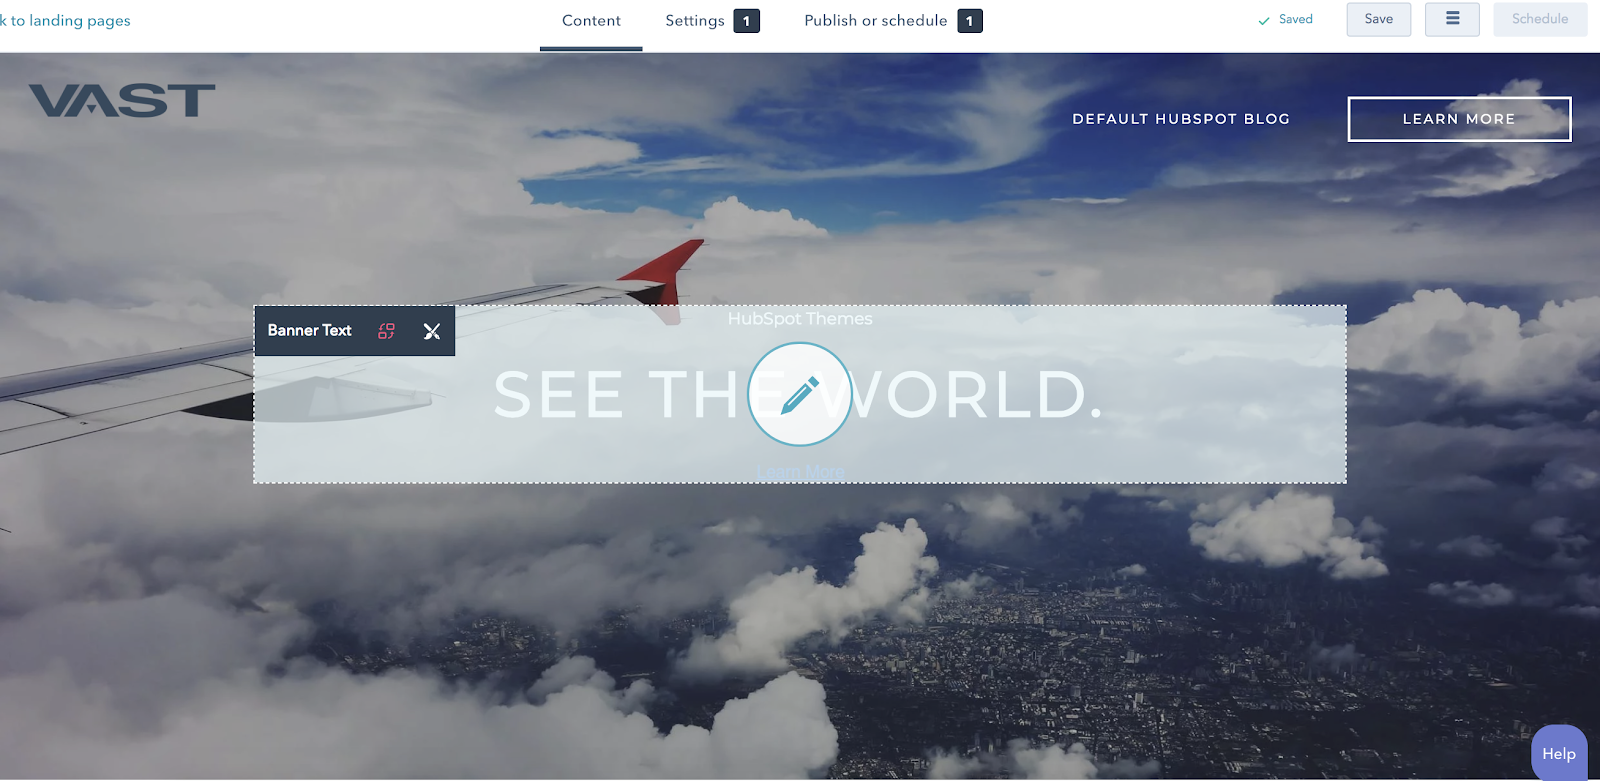
5. This is your landing page. You can scroll over text boxes, images, or other modules to edit them. In the below picture, I scrolled over the “See The World” Banner Text, and when I click it, it allows me to edit that text.
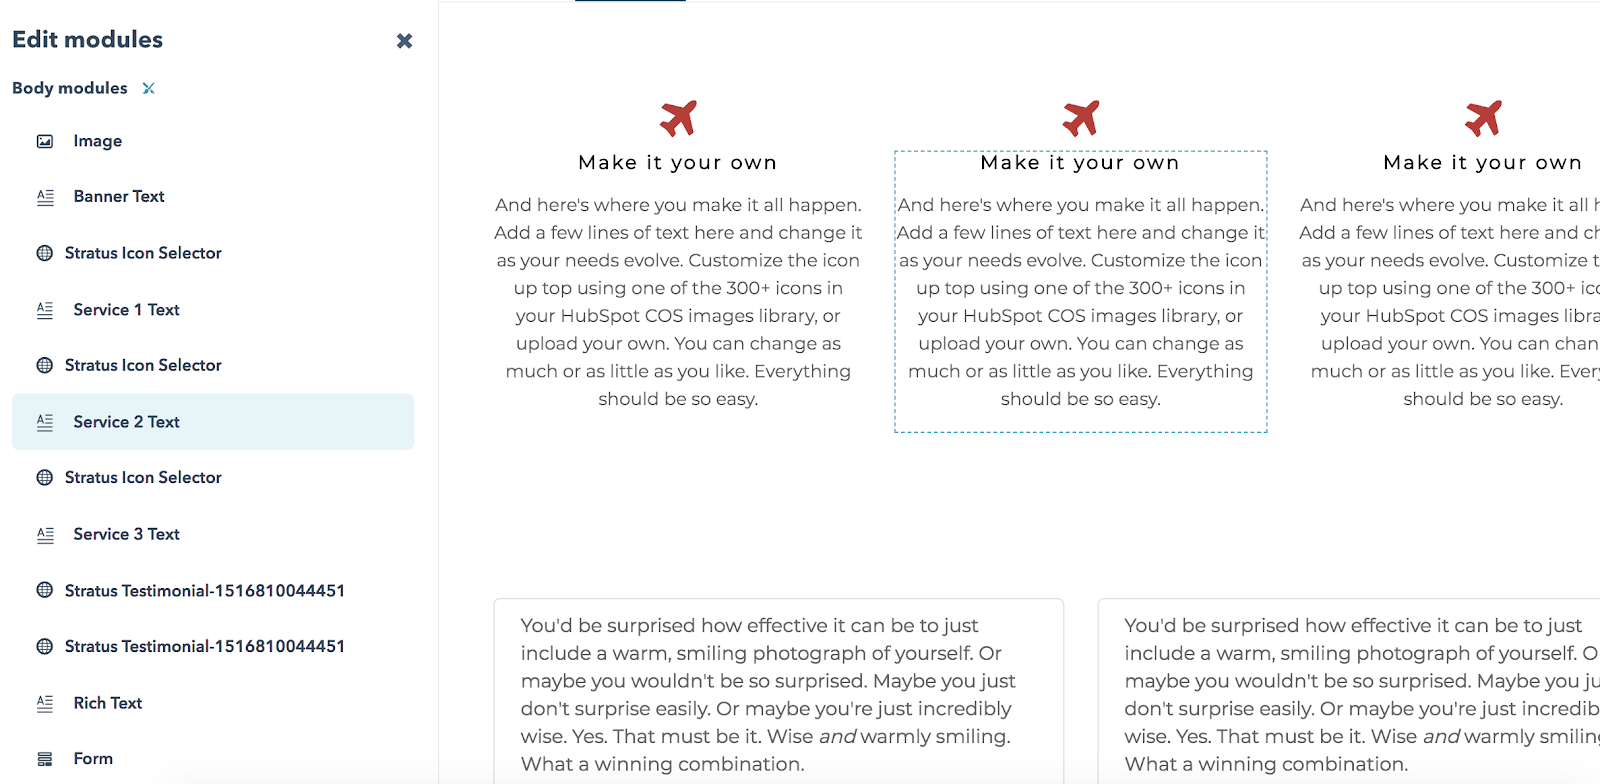
6. You can also click the “Edit modules” tool on the right side of your screen and edit from there. For instance, I selected “Service 2 Text”, which directed me to the “Make it your own” paragraph on my landing page. You can add texts, images, sections, forms, and more from the “Edit modules” section.
7. When you’re happy with your landing page and want to move on, go back to your dashboard and click “Content” at the top of your screen, and then “Website Pages”.
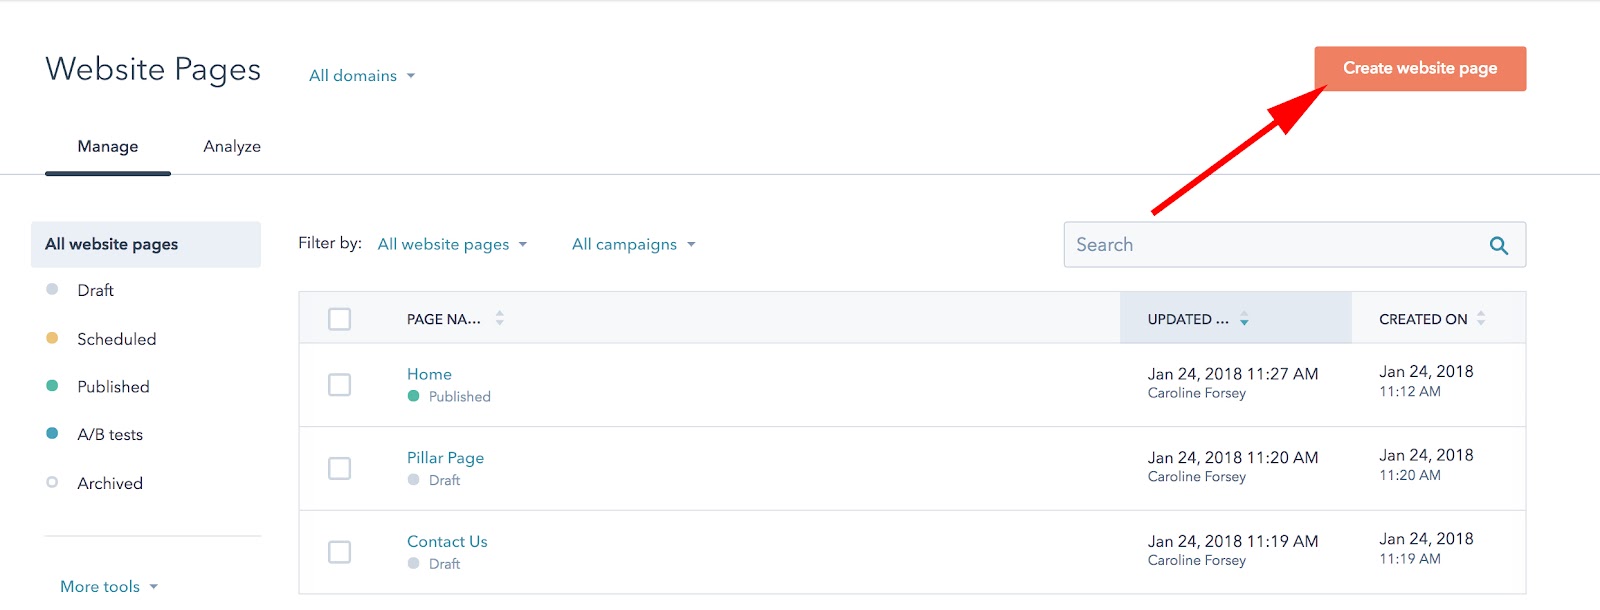
8. Here, you’ll click the orange “Create website page” button and name your page, just like your landing page. Then, you’ll be taken through a similar process of choosing a template and adding content. If you want a more in-depth tutorial, check out A quick tour of website pages.
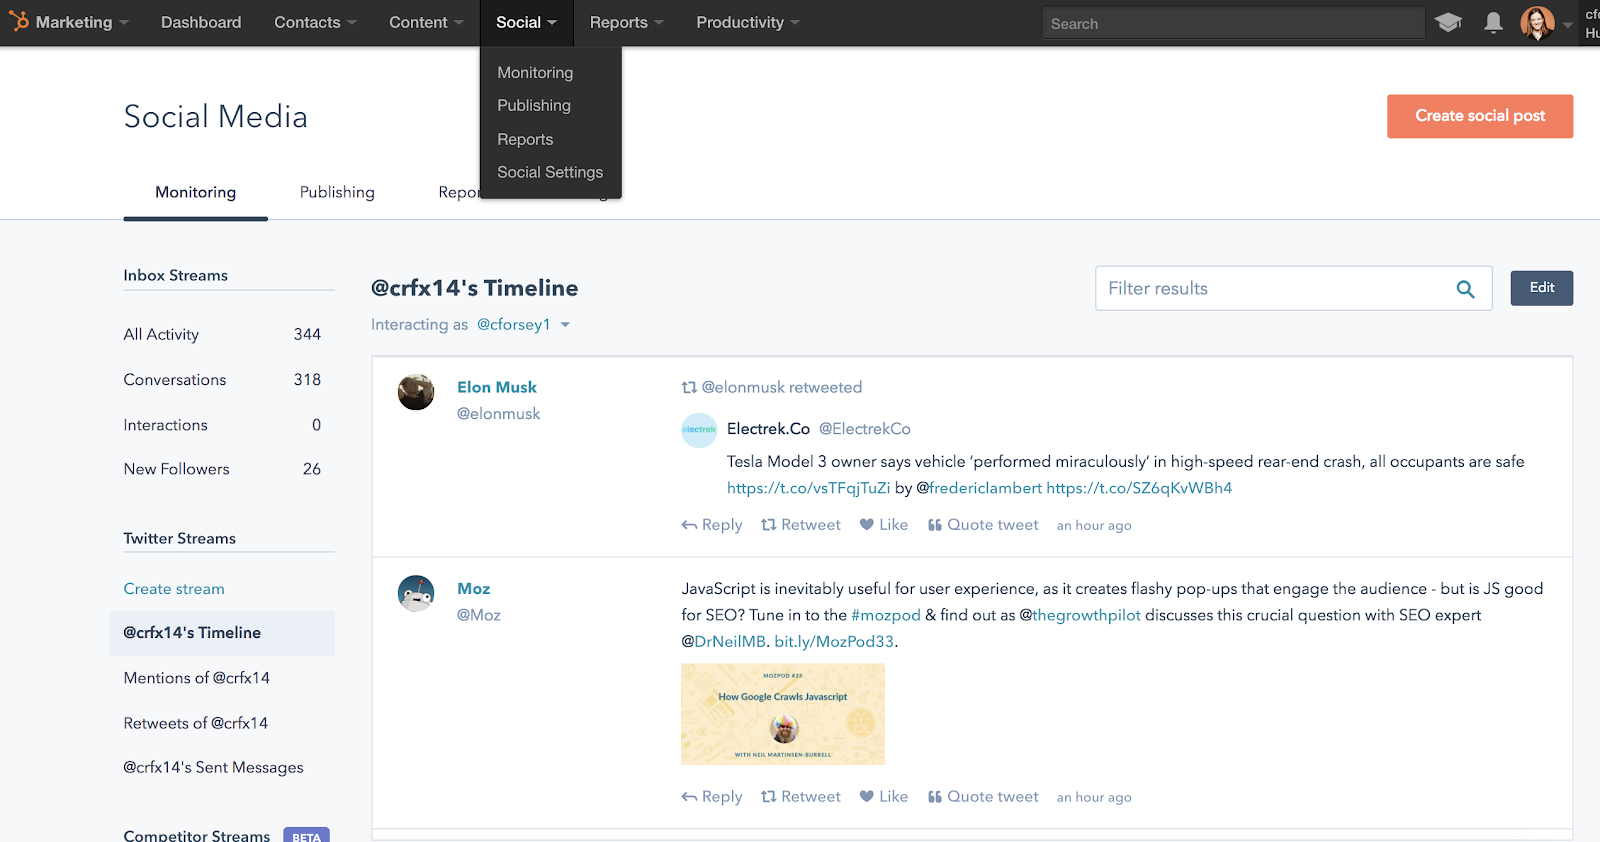
9. If you want to incorporate your social media accounts, click “Social” on your dashboard. You can monitor all your social media accounts and also publish tweets, Facebook statuses and comments, Instagram pictures, and other content straight from your HubSpot dashboard.
10. If you want to check out your site analytics, go to “Reports” and then “Analytics Tools”. You’ll need to install the tracking code, which is easy to do within the HubSpot platform by clicking the orange “Install the tracking code” button. If you’re still unsure, check out How to install the HubSpot tracking code.

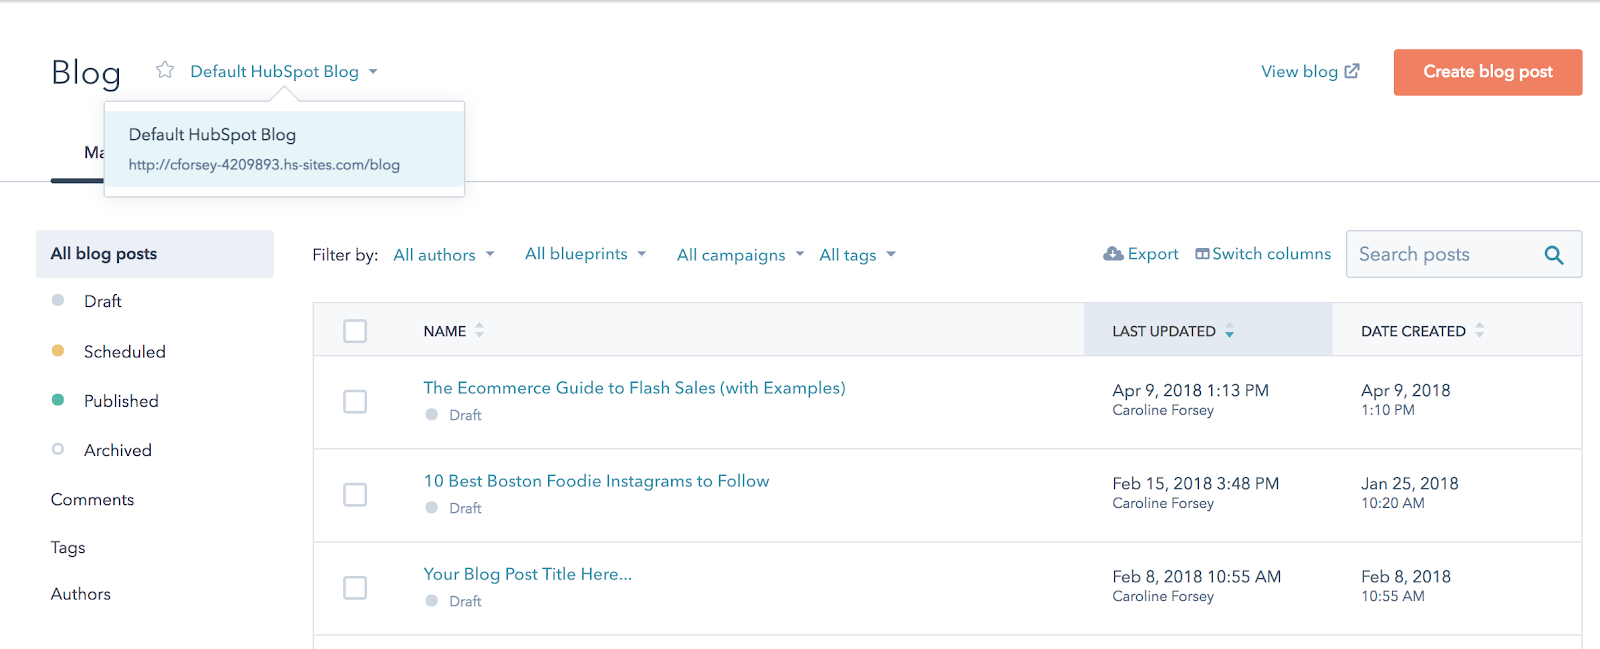
11. If you want to write blog posts, go to “Content” > “Blog” on your dashboard to create, publish, and monitor your website’s blog posts.
This is a fairly broad and general overview to get you started building a website with HubSpot, but there are plenty of more in-depth features and tools you might want to explore with a HubSpot specialist, or by checking out some articles on academy.hubspot.com.


![]()
